Saturday 27 September 2014

Well the work is finished for the week so no use waiting until tomorrow to publish the next installment in "The adventures of Harold's house build". When last we saw the intrepid house builder he was working on some deck posts and anxiously awaiting the excavation day. Well enough with the flowery prose and onto what happened.
As mentioned I finished the deck posts. The last two needed just a little work on the bottom end to allow them to fit into a deck post saddle. So with a brand new chisel and a little elbow grease this was accomplished. Once these two were done I finished sealing them with Thompson's Water seal and then placed them on a stickered pile under cover to await delivery to the house site. Here is a picture of the last two posts being worked on.


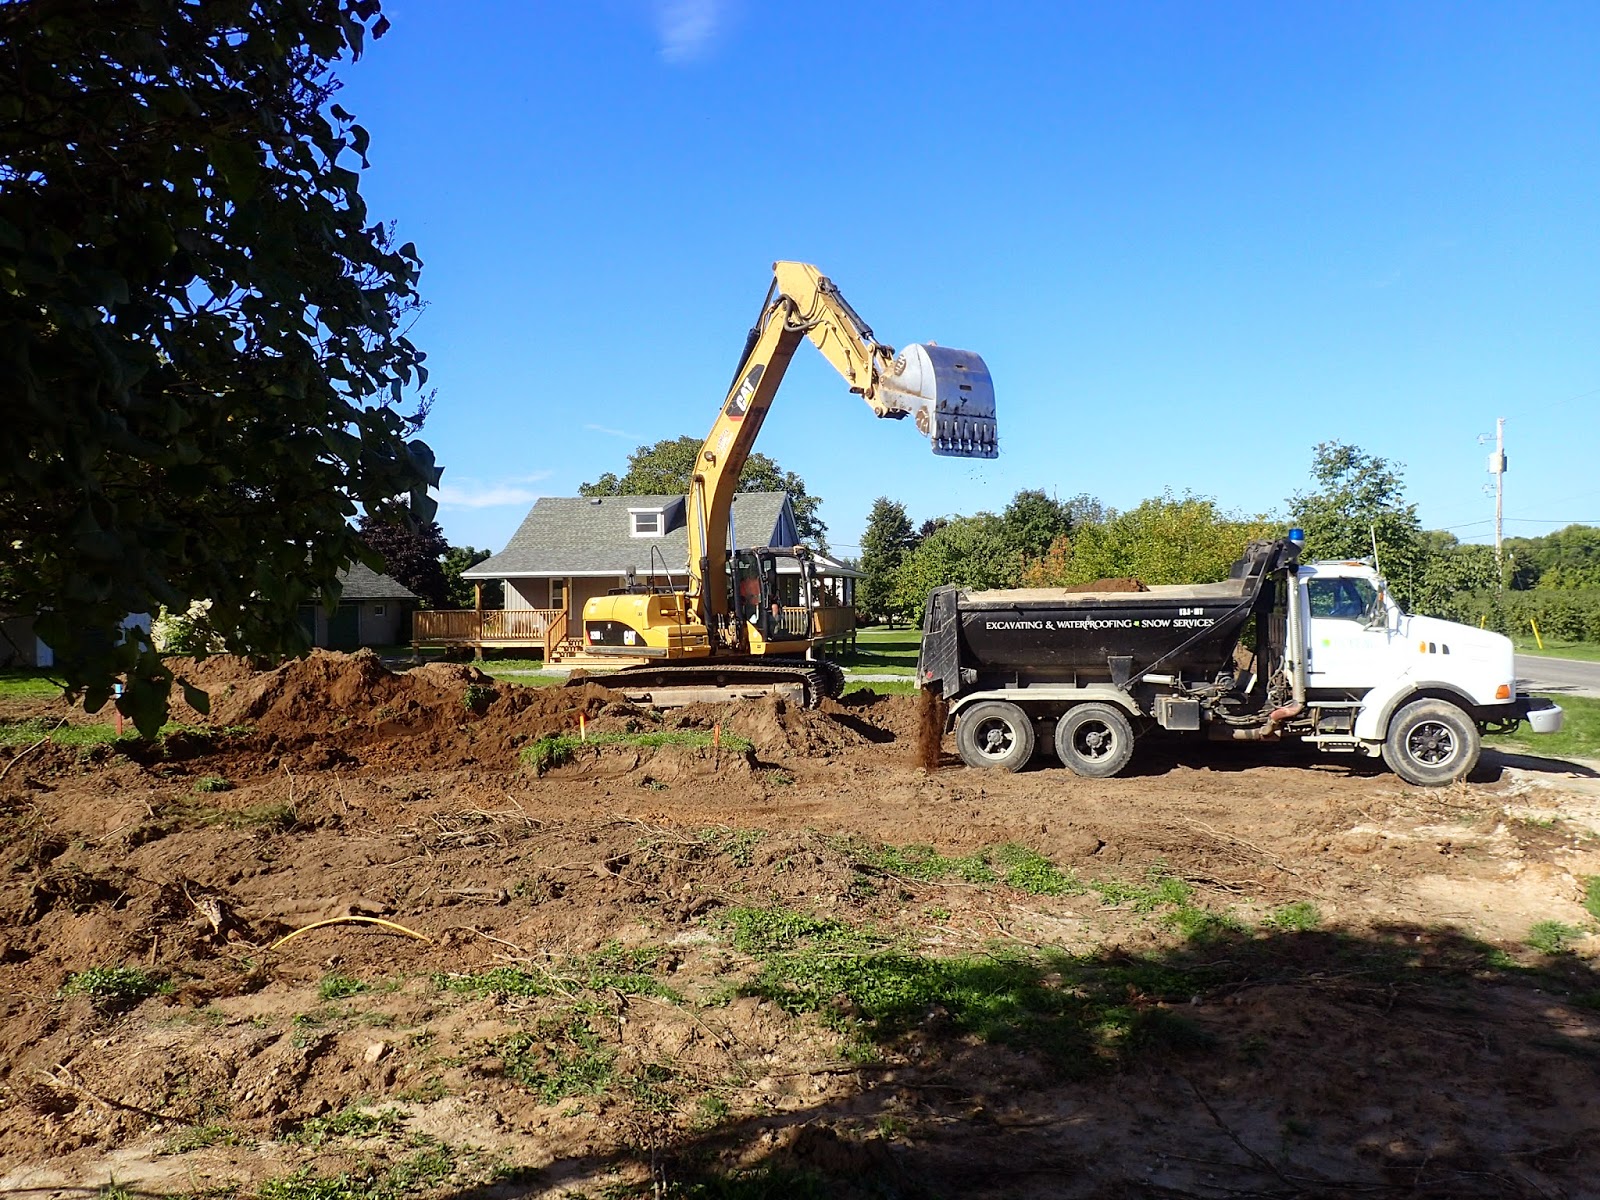
Ok onto the meat and potatoes of this weeks episode. On Thursday morning the excavator showed up at 0730. The two dump trucks showed up very soon after and by 0800 the excavator driver showed up. He first spent about 20 minutes removing all the stumps and cement garbage that was on the site. He then proceeded to move some of the topsoil around before beginning to dig for the Sewer and Water connections. Here are a couple of pictures from the beginning. 

Just before we hit the sewer connection location I noticed Bubbling water starting to show. To bad it wasn't bubbling "Texas Tea" like on the show the Beverly Hillbillies. More water started to show up once we exposed the end of the Sewer line. What I believe happened was that when they installed the Sewer line we had a few good days of rain. The bottom of the trench is clay soil so all the rainwater stayed in the trench in the gravel that was there and could not seep away. Once we exposed the end of the gravel seam it started to come out. When we removed the sewer cap the water would run down the sewer pipe into the sewer system. Well at least we know there is plenty of slope on that pipe to allow waste water to migrate down the pipe. Here's a picture of the exposed sewer pipe and the water going into it.


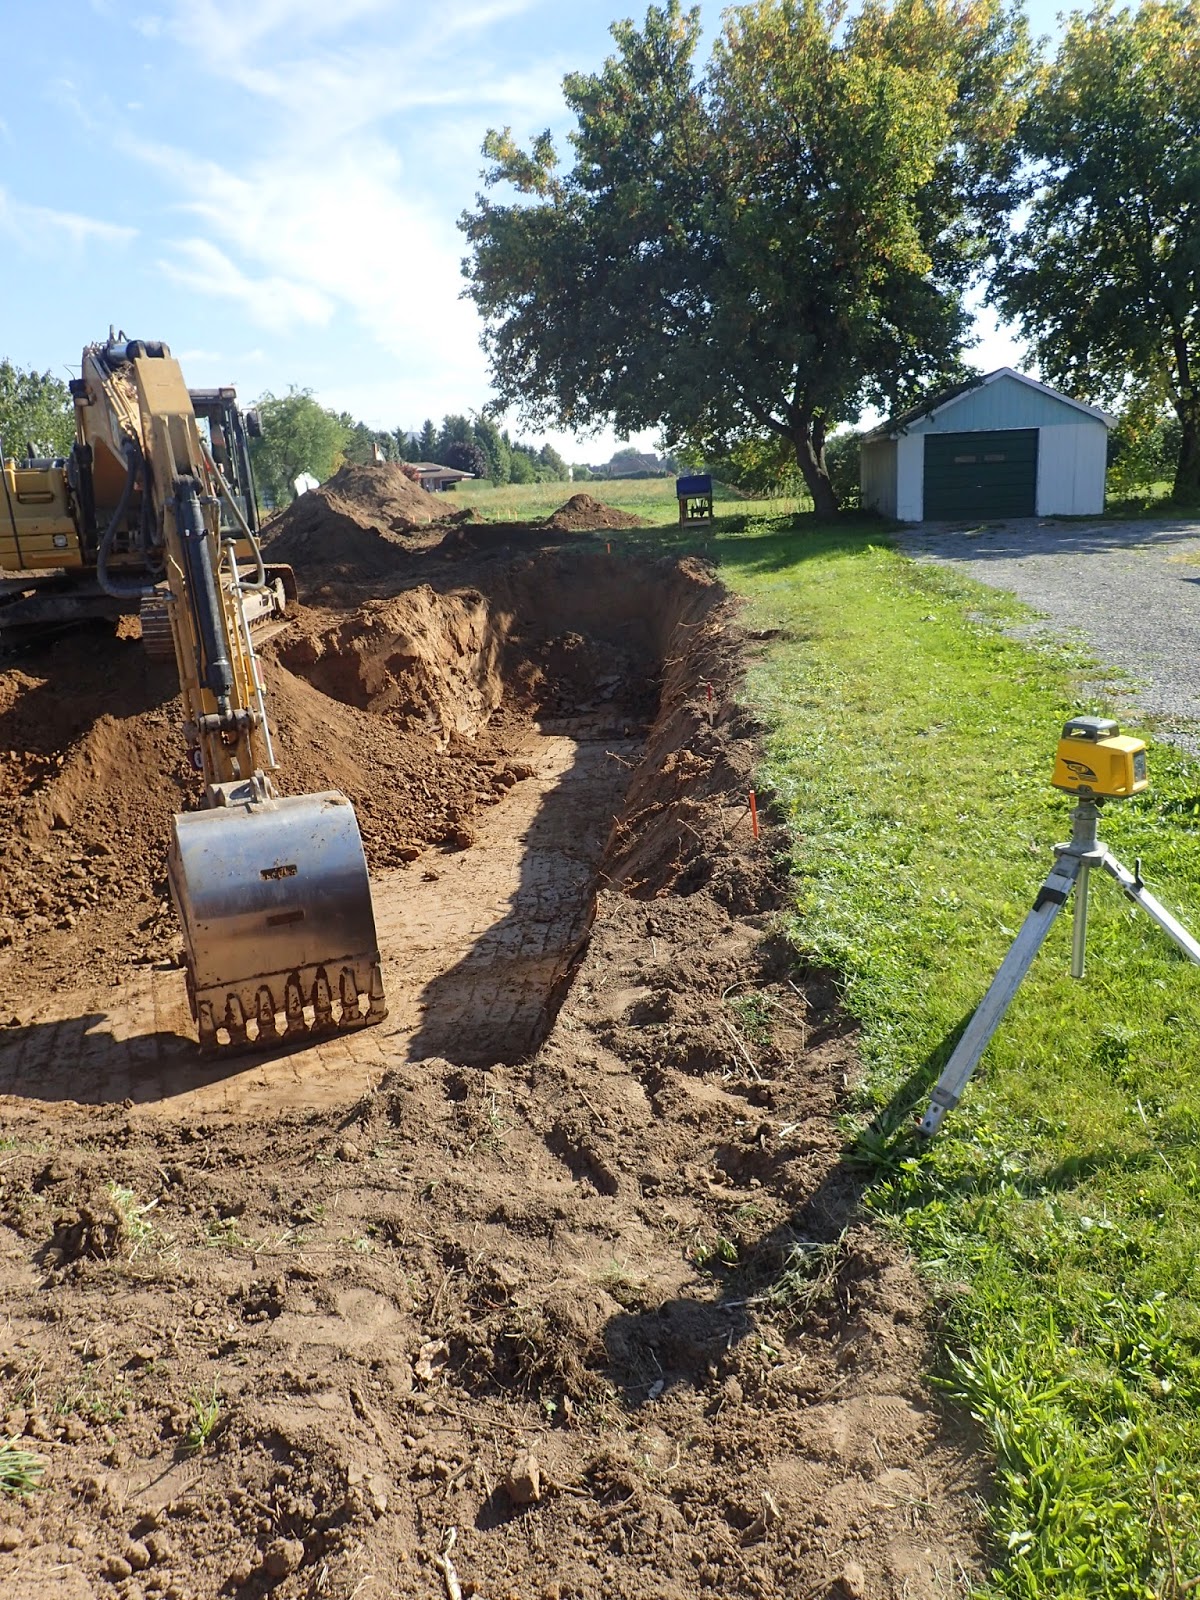
Well by 1230 the sewer pipe was installed and the water line was installed and at 1300 the city inspector came by and passed it all. By this time the pipe had started to float on the water that was collecting since we had closed up its access to the sewer system. Because of this I donned the old rubber boots and went down to stand on the pipe while the excavator slowly started filling in the trench. At the same time as he was working on the sewer line he was also working on the basement excavation. Where he was depended on when the trucks were there to take away the excess soil. Such that once the sewer line was finished there was also some work done on the basement excavation. Which also meant that once the sewer line was finished it was strictly the basement he worked on. He essentially took three passes down the house excavating a third of the basement on each pass. By the end of the day he had approx a little more than half of the house dug out. Here are some representative photos. The first photo shows the bench for the front porch piers. No need to dig down to footing level so this bench is 2ft above footing level ensuring the piers are 4ft below final grade. The second photo just shows him working on the second pass down the basement and you can see his laser level in the corner used to keep him level. The third picture shows the end of day results with the "safety fence" in place.


Day 2 started out a little foggy as the first picture will show. Day 2 was a repetition of Day one with soil being hauled away by two trucks. At least they were finished at noon and then it was just the excavator working on the site. I was glad to see the trucks leave since they are an extra cost I have to pay for. At least I did not have to pay to get rid of the soil. We had two locations that would take all that I could give them. However each load took 20 min and the trucks were costing 90$ an hour. Once he was finished with the house he went out to the back and bug out the footings for the Garage. This was a lot easier and faster as we only needed to go down 4ft and we did not have to remove the dirt in the centre of the garage. All that was required was to remove all the topsoil to ensure non organic soil remained behind to fill in the garage hole. By 1415 he was all done. He cleaned up his machine and by 1530 they came and picked that up. Here are a few pictures of day two. Again first one is the start of the foggy day. Second one is working on digging out the garage. 


 And right on schedule the surveyors showed up at 1430 to once again stake the house corners. This time they drove in a 1/4" dia round steel rod that will stick proud of the footing so that the same peg can be used to line up the wall forms. They used the same method as described in last weeks blog siting in on at least three survey stakes to get the Theodolites position and then plotting the stakes. The Theodolite sends out a  red laser beam which helps the assistant locate stake position and he then uses a small mirror to allow laser beam to be reflected back to the Theodolite where calculations are made which tell the operator if the stake needs to be moved and by how much. To give you an idea of accuracy they work down into mills. Once they are less than a mill away from expected readings then they drive the stake into the ground. Here are a few shots of the surveyor and the resultant pegs. These pegs are just barely visible as orange stakes with a little orange wooden block on top of them in the first picture. The third picture has a better shot of the corner stakes.


By 1600 they were finished and I cleaned up the work site. Today I went out and located and set rebar pins for the piers. Using the corner stakes I ran out strings from corner to corner and then with a level and tape measure calculated the position of the lineup of the piers. Once I had the distance forward from the wall I then strung another string down the side of the house and extended it onto the pier bench to find the location of the extended wall. Then 7" in from this was the first stake. Then 8' - 2.5" down the string was another pier and so on until I had all 5. And just to be sure I checked and the last one was 7" in from the other wall so all was good. Using these methods I pinned the front, back and side porches. Here are a couple of pictures. The first one shows the rear porch bench with the stakes in fluorescent green paint and in the second one you can see the side porch pins with some rebar awaiting placement in the pads. 


Well by 1300 I was finished and another week is done. Next week the footings go in on Monday and hopefully gravel by Wednesday and if lucky the wall forms will be up before the weekend as well. Well until next week enjoy the nice weather who knows how long it will stick around.

Take care

Harold


Sunday 21 September 2014

Well we're getting closer to "D-day" or for me that is Digging day. This Wednesday the excavators are supposed to start the excavation and I hope by the weekend we might have the forms for the footings in place. To this end the Surveyors were there on Friday staking the "corners of the house". This is a critical piece of information as I'll mention later. Now I asked to be there so I could see how this was done. Earlier the Surveyors had taken my blueprints with my dimensions and planned locations and transcribed them to an official survey and using the official survey stakes at the four corners of the property calculated the points where the stakes would go for the corners of the house and garage as well as elevation of the house and garage. So the gentleman, Sam and Dave, came out to stake my house. As I believe I mentioned in my last post I had also staked the house using string and measuring tapes. Sam and Dave however were using the latest laser designating transits, capable of very precise measurements. In the first picture Dave has just setup a laser reflector over one of the four survey stakes.

In the next picture you can see Sam with the Transit and in the third picture Dave is at a second survey stake with the portable laser reflector.


For those who don't know how it's done, as I didn't, what they do is setup their transit and once that is stabilized they took bearing and distance measurements from three of the survey stakes. The fourth was buried in a bush and not easily accessible. By getting these measurements the Electronic computer attached to the transit can calculate the exact spot on the property that the transit is located. I would assume you might be able to do this with just two official stakes however the more you use the better your accuracy. Once the Transit knows where it is it can then be used to tell the surveyors where to go to plot the corners of the house. So once the calculations were done Dave went to plot the first corner of the house while Sam ran the Transit level. What Dave did was place his mobile laser reflector close to where they felt the corner of the house should be. Then Sam would take a reading with the Transit and it would tell them whether they had to move the stake left/right or in/out. Once the Transit advised the crew that the reflector was in the correct spot Dave would then hammer in a wooden survey stake to signify the corner of the house. I was curious as to how I had done and was pleasantly surprised to find that they posted the first stake within 3in of my stake. The only issue was they posted their first stake by my porch stake which was 6ft away from the corner of the house. So I thought to myself maybe they will stake the four corners of the hole that needs to be dug not just the house footings, so I kept my mouth shut. Well once the third stake was installed I knew we had a problem. The second stake matched up with the other corner of the front deck but the third stake was 6ft short of where the end of the house was. So I called a stop and we looked over the information they had to find problem. Turns out that somebody in the office had inadvertently plotted the corner of the deck instead of the house. This meant that all four corners were out by 6ft to the North. The East/West lineup was good and the distance between the house and the garage was good, however the garage by this default was also 6ft in error. So they took a few minutes to work on the computer and compensated all the points for this error. Once this was done they replotted the corners of the house and this time they were with in 3in of where I had my stakes. It looks like my North/South lineup was good but my East/West lineup was in error by 3in. I was 3 inches closer to the property line than they were. The first picture below show Dave setting up one of the house corners. The second shows him setting up one of the garage corners and the third one shows one of the survey stakes and mine.


So now the house was plotted and they moved onto the garage, With the garage I was not as confident on my positions. Well turns out my North/South was out by approx 20in but my East/West was spot on. So not to bad for an amatuer with just string and tape measure and Pythagorean's theorem. However everything was still not perfect. I have a small shed on the back of the garage that is 8ft deep and 10ft wide and is recessed 2ft to the East from the West wall. As they were plotting these corners I noticed a problem. Turns out that the office had extended the west wall into the shed and not done the 2ft offset. So once again back to the computer on the Transit to fix up the coordinates. Once this was done the stakes were corrected and everything now looks exactly as it should. The last thing they did was insert two stakes one near the front of the lot and one near the middle of the lot to be used as grade stakes for the excavator to use to calculate the depth of the hole for the footings so the foundation wall is at the height requested. This is done using the topography of the land. 

On Saturday I went back to the property with my simple Transit level and a measuring stick to see how the elevation stakes worked with the house and garage stakes. Well the house elevation is good however the garage elevation was such that one corner of the garage would have the concrete wall 2in below the level of the current grass. Having a look around told me that I could not remove soil to correct this so on Monday will talk to the Survey crew about changing that stake and raising it by 6in. I believe that all that will happen is to advise the excavation crew to adjust their digging by 6in. 

Well that was all that happened at the lot. At home I started prepping the 14 posts I bought for the deck roof supports. I checked to ensure that one end was square to the post then chamfered the the 4 corners slightly and cleaned the post with wire brush and fibre brush. Once done I gave them 2 coats of Thompsons water seal for initial protection. Two of the eleven footers need to have a small amount of the post removed to allow them to fit on the galvanized post saddle but unfortunately the rain came and I could not complete this before posting this article. However here is one picture showing the posts under work. The front pile is the initial pile the three on the sawhorses are in production and the three to the left are drying after their application of the Thompson water seal. At this time only the 2 that need work are left the rest are all done awaiting delivery to the lot.


Other than that all I did was spend money buying waterproofing material and items for the garage. I might as well buy it now when I get discounts then later on at full price. Every little bit helps and if Lowes is willing to sell me paint at 2 for one and Home Depot is willing to give me 10% discount just for using their credit card who am I to say no thanks I'll pay full price later on when I really need to buy this. 
Well if all goes well we should have some better construction photos for you next week. Until then all the best and have a great week.

Harold

Saturday 13 September 2014

Well we have "lift off" or in other words "the permit has landed". On Monday the Building inspector called with some minor questions that needed clarifying, and by Wednesday morning I was advised I could start booking tradespeople as the permit was approved and just needed final signatures. Well that was good news. On Wednesday and Thursday started firming up dates for the initial tradespeople and on Friday I picked up the physical permit. After going over their notes and extra requirements looks like I did pretty well on my design and calculations. So on Sept 24th I'll be a very happy camper as I watch the excavator from Cotton Inc start clearing and digging. Then the work begins. The hope is that the Framer will start on the 20th of Oct and the Roofer in the first week of Nov. I've also arranged for Plumber to hopefully come out last week of Oct for the underground stuff and the HVAC will most likely start second or third week of Nov. This also meant the bankbook is a little lighter as the deposit cheques started going out. Oh well the price of building a house.

Nothing really happened at the building site other than keeping the grass and weeds trimmed. Had a meeting out there with the coordinator from Cotton Inc to look over the property so they could plan their course of action. That really left me with very little to do this week. However we did manage to get one thing done. I will have a cold storage that will have a slab poured on top as well as a deck surface over this. I will need to support the deck rim joist against the end of this slab. So I decided I would need some special anchor bolts. Normal anchor bolts of course go straight up and down. You insert the "J" portion in the concrete wall and leave the threaded portion out sufficient length for the sill plates. In my case this will be 4" as I will be having a double sill plate. However I did not want a straight pin coming out of the slab as support for the deck rim joist. So I bought seven 16" anchor bolts with the intention of having a 90degree bend placed in them so they could be inserted in the concrete wall and then stick out for the rim joist. My initial plan was to get a local person who has a bit of a machine shop do the work for me. However he got busy I presume getting ready for a trip overseas and never called me back. So while sitting on the front porch looking at my truck it occurred to me that if I removed the trailer hitch ball there was a hole in the receiver that was just a bit larger than the anchor bolt and maybe with some judicious heat and force I could bend them myself. Unfortunately I do not have a large enough or strong enough vise setup in Mom's garage to do this. Well that was a great plan however trailer hitch ball had other ideas and didn't want to come loose. So on to plan B. When I was preparing plan A I had brought out a concrete block to be used as a support for the end of the anchor bolt. After looking at the block I realized that if I placed a spacer in one of the holes there was just enough room for the "J" end of the anchor bolt and the height was just the correct height for where the bend in the anchor bolt needed to be.

So we now had a plan of action, we assembled all the tools required, torch, gloves, concrete block, wooden spacer and a pipe to bend the bolt. Here is a shot of some of this.


So we have Oxy-Acetylene system with torch and a concrete block with a wood spacer. Only issue here was that the tip attached to the hoses was my small one and therefore the time to heat the anchor bolt was longer than normal. However we then proceeded to heat up the anchor bolt at the bend line. Once heated sufficiently we used a longer pipe that slipped over the threads to apply force to put a 90 degree bend in the anchor bolt. Here are two pictures showing the heating and bending process.


After the angle was reached we placed the part aside to cool and went on to do another one. And that is how I "McGyvered" a straight anchor bolt to a bent anchor bolt as shown in the following two pictures.


Well that was the extent of the work this week. Next week it's off to pick up the 6 by 6 Fir timber's I'll be using for the porch posts and planning the list of materials needed for the Framer when he starts. I'm still not sure which TJI floor joist I plan to use. I am waffling between the TJI31 and the TJI47. They both have the same web structure the only difference is the flange on the 31 is 2.5" and the flange on the 47 is 3.5". This makes a stronger joist and a resultant stiffer floor however there is also a 2000$ differential in price and I'm not sure I'll notice the difference. I have decided on the flooring material and this will be Advantech 3/4" T&G flooring. I also plan to use the Advantech 1/2" sheathing on the roof trusses when we get to that stage.

Well until next week. Enjoy and stay safe out there.

Harold


Saturday 6 September 2014

Well I was really hoping for better news this week. On Wednesday I went to City Hall to check up on the status of my building permit. I was really hoping they would say "It's done" especially since an inspector was working on it the previous Friday. However the answer I received was "no it's not done and no news is good news". Well Friday afternoon came and went and still no call. I know that City Hall has 10 business days to finalize it which will be next week Monday however I was really hoping since somebody was perusing the file they might finish sooner. Oh well you can't fight City Hall.
About the only thing I accomplished this week was to build a couple of stands for a few water barrels at the building site. I should have water there within a week of them starting since the water line goes in before the footings are poured. However in case they don't turn on the water right away wanted some water around for cleaning hands, mixing mortar, etc etc. Here is a picture of the project.


The other thing I did was go up to the local Lowes to buy some insulation for the garage radiant floor heating system. Lowes had a sale on these panels called SilveRBoard by AMVIC which are designed for beneath concrete slab applications. The panels are 4by8ft by 2in thick. These panels were regularly around 43$ but were on sale for 36.54$. As well Lowes had a beat the tax sale on this weekend where everything in the store was discounted by the amount of tax paid which by us is 13%. Therefore after the complicated math was done I paid a little over 35$ per sheet. The reason I said complicated was even in this highly electronified age the computer still got it wrong. The initial discount the program gave me was only around 1.5$ instead of the close to 4$ it should have. After talking to Customer services they finally agreed and refunded me the difference. It pays to check your bills and be mentally capable of doing simple math to check out the computers.

So with this purchase Mom's garage is getting full of my stuff for the build. Here is a picture of the garage. The 26 panels are visible as well as the Bluewood studs on the left side. Also visible is a new ladder I bought myself for the project. I'll tell you about that below.


Ok as mentioned before I am always looking for deals for my build. I just discussed one above ref the insulation and here are two more. The ladder is a 24ft fibreglass ladder rated at 300lbs which is great for a guy my size. Now I watch all the flyers for Rona, Home Depot, Home Hardware, Canadian Tire and Lowes. Lowes had this ladder on sale for 165$ vice the regular price of 265$. Now all 4 hardware stores will price match, so went down to the local Home depot and picked up the same ladder for the sale price plus another 10% off since Home Depot says "price match plus 10%" so the ladder only ended up costing 148.50$ plus tax. Great. Another thing I found out was that if they screw up with pricing on their system they give you a 10$ discount on the item. What happened was, I picked up a case of 1000 deck screws. Now the tag on the shelf said this case was 38$ when I got to the cash register it rang in at 46$. I advised them this was not what the shelf tag said. An associate went down and checked and she went to one end of the shelf and there the tag was 46$ however at the end where I had picked up the case the tag said 38$. The end result was I got the case for 38$ and then another 10$ off due to the Scanning code error. So again keep an eye on the shelf tags and what rings up in the computer.

Well I hope that on either Monday or Tuesday at the latest I'll have word on the building permit. Once that is complete it's full steam ahead. 

Until next week.

Harold