On Sunday we spent the morning varathaning the cabinets with the fourth coat of varathane and once it was dry we started installing the drawers. Before evening arrived I had managed to install nine of the twelve drawers. Then we had to stop so I could clean up and go to the company Christmas Dinner. Had a lovely time and a great meal. First picture shows the first bank of drawers installed and the second picture shows the status at end of day.
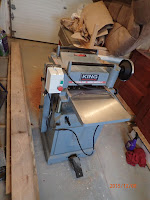
So on Tuesday we started the day by moving the leftover sand from the masonry work. I wanted to move this so we had easier access to the garage as later in the day a fellow from work was delivering a 15inch thickness planer. I needed this planer to clean up the drawer fronts and the fellow at work did not have a 15inch planer he only had a 13inch planer. So by end of day Monday I had bought a new thickness planer from work and made arrangements for delivery. Once delivered it took about an hour to clean up all the grease and protective material and to finish setting it up. Once it was all done we ran a test piece through and then ran the 8 drawer fronts through that needed planing. While waiting for the planer delivery and after moving the sand we managed to finish installing the last three drawers. I like having full extension drawer slides however I do find them a little more unforgiving in regards to drawer and cabinet fitment. I took a while to get the drawers all fitted and moving. A couple of the drawers might need a little more work to get them to move a little easier. So here is a picture showing the new sandpile beside the garage, then we move into the garage for a picture of the new planer. Finally we have a photo showing the 8 drawer fronts stacked up after going through the planer.
On Wednesday we varathaned the drawer fronts twice. We also spent some time installing some of the window trim in the last two windows. After this we started working on building the drawer and installing the supports and drawer slides for a drawer that will sit above the fridge where you would normally have another small cupboard. This drawer will remain open so whatever is stashed up there will always be visible. Again we needed to work with this since there was a slight taper between the wall and the side of the cabinets. Lastly we prepped some trim to be used as a coat hook rack in the master closet and a shelf that will be situated above the washer and dryer in the back entrance. Here are some pictures showing this. First picture shows the side supports and drawer slides above the fridge area. Second photo shows the drawer that will go there after glue up and sitting in clamps. Final pictures shows the pieces for the coat rack and shelf after their first coat of white paint.
On Friday we managed to paint the trim and varathane the drawer fronts after work.
On Saturday we started by putting the final coat of varathane on the drawer fronts and then putting the third coat of paint on the trim pieces. I then setup the tile saw and proceeded to work on dry fitting the flooring tile for the spare bathroom. These are white porcelain tiles with a marble looking finish. They are also 12inches by 24inches so are not small. I dry fitted the tiles around the toilet and shower area before stopping. I then laid out the heating cable in the Ditra membrane. I had to be a little creative near the end however the entire length of cable fit in. Since you cannot cut this cable you buy it for the square footage you plan to cover. Then you are restricted to ensuring the cable is no closer than 3inches to walls, cabinets and itself. As well it needs to be 8inches away from heating ducts. I now have enough tile cut to be able to start installing this. Not sure whether we'll do this tomorrow or wait until Tuesday. Here is a photo showing the cable laid out in the Ditra membrane. As well you can see some of the tiles lying down in the area where the vanity will go awaiting installation.
Well that's it for now. Next week I hope to be able to state tiling is finished and maybe we've started to work on the floor install. If not I'll be installing my floor during the week of Christmas. Until then enjoy the reasonably mild winter we're having so far.
Harold


No comments:
Post a Comment