Well after 68 million, 265 thousand, and 900 seconds the story has an ending. On Tuesday the 22nd of October we received the final inspection sign off. It has be a long road but we have finally reached the end. This is not the end of working on the house but it will be the end of this particular chapter and this Blog writeup. Slowly over time I will finish the basement to a usable level and I still have some landscaping to do next year once the weather warms up. Now however, I will be taking it a little easier and hopefully getting to play around in my workshop a little over the winter. I thank those that have followed this Blog and I wish you all the best in the future. I hope this have been informative and maybe usable in your own endeavours.
With this in mind all the best and have a great future.
That's all for now.
Harold
Sunday, 27 November 2016
Sunday, 6 November 2016
Well the upstairs area is essentially done for now
As the title says, I've essentially finished the upstairs area. All that is left is to slowly buy the remaining light fixtures I want and replace the bare bulbs I have now. As well sometime in the future I will most likely make the doors for the upper cabinets. So let's see how we got to this stage.
At the beginning of the month I continued working on the last upper cabinets that I wanted to install in the kitchen. The construction process is the same as the other cabinets. This cabinet will have two cupboard sections on the left side and two shelve sections on the right side. After construction and varathaning they were installed. Here are some photos showing the process. First picture shows the unit during varathaning, you might notice some of the shelves hanging to the left of the unit. To save time I sprayed all the varathane on this unit. Second picture shows installation and last picture shows the extra little shelves installed on the left and cabinets filled up.


While I was varathaning this I also did some work outside since the weather was still nice. First I dug up some dirt on the east side of the garage so that I could make a parking area for my utility trailer. After digging out the dirt I laid a base of gravel for some retaining wall stones and then placed these stones on this prepared base. I laid two coursed just like I did around the house. The continuation of this mini wall will be the outside edge of my driveway when completed next year. I also spread some dirt on the ground on the west side of the garage and graded it for grass seed. I spread grass seed and the weather gods were nice to me and grass has sprouted. Here are a couple of photos showing this work. The dirt in the second picture now has a decent coat of green grass.


Ok now we had some fun. Went out on the third week and decided to finally buy my TV. This TV would be flat panel and hung on the wall. Since I don't have any studs to mount to I needed to be a little careful installing the wall mount. First I calculated where I wanted the TV to hang and then figured out where the wall mount would need to be. I then carefully cut out the drywall from this area and installed a 7/8" thick wood slab that was glued and screwed to the OSB wall structure. I then pre drilled some holes and mounted the wall mount with 10 coarse flat head screws. This TV will not fall down. After the glue dried we mounted the TV and then hooked it up. I now have an entertainment appliance. Here are two photos showing the wall mount and then the TV on the wall.


Earlier in the month I ordered some cast iron railing balusters to use on the front deck railing. They came in mid month and within in the week they were installed. The balusters are secured to the deck by small pocket clips and are slid into the vertical cedar rail piece at the top. Eventually I plan on installing cast iron balusters along the entire front of the deck. Here is a photo showing the west side of the front deck and the finished railing.

Also during the later part of the month I installed the mirror in the spare bathroom. Here you can see a photo of it hanging in place.

Ok we're down to the last two things that happened in October. One I extended the driveway wall eight feet as I still had some stones left. It actually looks like I will be able to extend it another 8 ft this coming month if the weather permits. Then I'll run out of stone and leave the rest till next year. I also started work on installing my weather station. In the section describing the rear storage area the second picture showed the "junk" sitting there. Some might have noticed the black TV tower sections lying there. These will be linked together and raised up on the east side of the garage to act as a base for my weather station. The station is a Davis weather station capable of windspeed and direction, temp, humidity and rainfall. First I dug a 12" hole beside the garage down 4ft and created a rebar cage with three long threaded rods that will stick out of the concrete and allow the tower base to be bolted to it. Once the concrete dried I installed two units together and raised them up to find out where they were in relation the the garage eave. I then picked up some angle iron and have made up a bracket to mount the tower to the side of the garage. At this point I had to stop as I did not have enough hardware to mount the entire tower. I'll finish the installation this week and raise the tower later this week. For now here is a photo showing the base and one tower length lying on the ground.

At the beginning of the month I continued working on the last upper cabinets that I wanted to install in the kitchen. The construction process is the same as the other cabinets. This cabinet will have two cupboard sections on the left side and two shelve sections on the right side. After construction and varathaning they were installed. Here are some photos showing the process. First picture shows the unit during varathaning, you might notice some of the shelves hanging to the left of the unit. To save time I sprayed all the varathane on this unit. Second picture shows installation and last picture shows the extra little shelves installed on the left and cabinets filled up.


While I was varathaning this I also did some work outside since the weather was still nice. First I dug up some dirt on the east side of the garage so that I could make a parking area for my utility trailer. After digging out the dirt I laid a base of gravel for some retaining wall stones and then placed these stones on this prepared base. I laid two coursed just like I did around the house. The continuation of this mini wall will be the outside edge of my driveway when completed next year. I also spread some dirt on the ground on the west side of the garage and graded it for grass seed. I spread grass seed and the weather gods were nice to me and grass has sprouted. Here are a couple of photos showing this work. The dirt in the second picture now has a decent coat of green grass.


Next I decided to dig out some dirt from the rear of the garage and make another storage area for "junk". This time instead of stone I just laid down to rows of 6by6 green pressure treated timber to act as the break between the gravel and the grass. Put down some landscape fabric to help prevent weeds and then spread some gravel. Here is my extra storage area.


Earlier in the month I ordered some cast iron railing balusters to use on the front deck railing. They came in mid month and within in the week they were installed. The balusters are secured to the deck by small pocket clips and are slid into the vertical cedar rail piece at the top. Eventually I plan on installing cast iron balusters along the entire front of the deck. Here is a photo showing the west side of the front deck and the finished railing.

Also during the later part of the month I installed the mirror in the spare bathroom. Here you can see a photo of it hanging in place.

Ok we're down to the last two things that happened in October. One I extended the driveway wall eight feet as I still had some stones left. It actually looks like I will be able to extend it another 8 ft this coming month if the weather permits. Then I'll run out of stone and leave the rest till next year. I also started work on installing my weather station. In the section describing the rear storage area the second picture showed the "junk" sitting there. Some might have noticed the black TV tower sections lying there. These will be linked together and raised up on the east side of the garage to act as a base for my weather station. The station is a Davis weather station capable of windspeed and direction, temp, humidity and rainfall. First I dug a 12" hole beside the garage down 4ft and created a rebar cage with three long threaded rods that will stick out of the concrete and allow the tower base to be bolted to it. Once the concrete dried I installed two units together and raised them up to find out where they were in relation the the garage eave. I then picked up some angle iron and have made up a bracket to mount the tower to the side of the garage. At this point I had to stop as I did not have enough hardware to mount the entire tower. I'll finish the installation this week and raise the tower later this week. For now here is a photo showing the base and one tower length lying on the ground.

Well that's all for now. Next month I should have the results of the final survey in and hopefully have my final inspection as well. See you in December.
Harold
Sunday, 2 October 2016
We all make mistakes at one time or another
Time for a little update and an explanation of the title. At the beginning of the month I made two shelves for the linen tower in the spare bedroom. I thought I had them measured correctly. Well after three coats of varathane I went to install them and they slid right between the shelf supports. Turns out I made them 1" to narrow, so instead of throwing them away I decided to add two pieces of Teak to the shelf, one on each side. Here's a picture of the shelf with two pieces laying on it prior to glue up.


Also at the beginning of the month the countertop company came in and installed the countertop. Once it had sat for a day I hooked up the taps and drain. By this time the shelves had been fixed and were installed as well. Here are two photo's showing the shelves installed and the vanity all plumbed up.


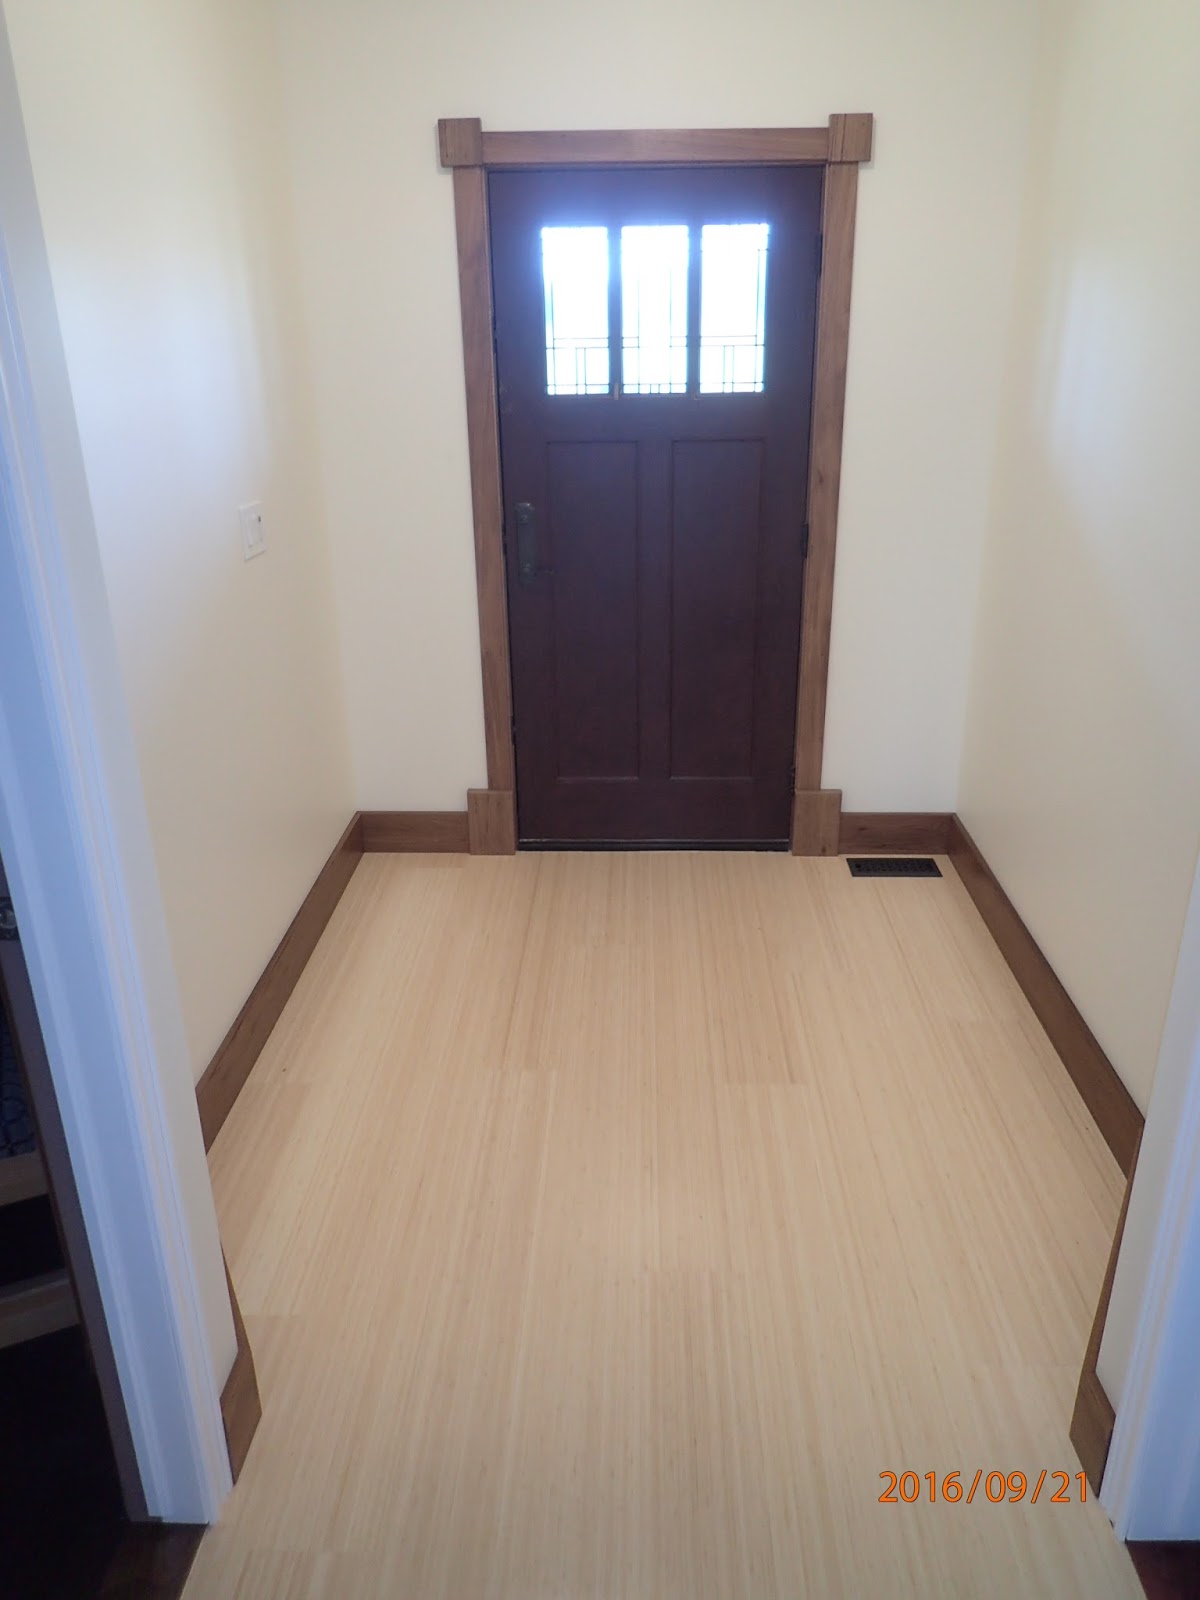
I then decided to start work on making some trim for the front entrance. I decided to do this in Teak. I had some 1/8" strips left over from working on the wainscotting in the living room so I glued them up to make a few pieces that were 1/2" thick by 1" wide. I needed these to extend the door jamb to the thickness of the drywall. Once they were done and varathaned they were installed. Next we installed some blocks at the bottom of the door trim and then the baseboard and casing. I also installed some smaller blocks at the top of the doors for the casing to butt up to. Unfortunately my esthetics failed me and the proportions were screwed up. For now I'll leave it but I think that sometime down the road I'll replace the casing with wider stock to make it look better. Here are two photo's showing the glue up of the teak and the front entrance after installation.

For the last few days I've been working on some more kitchen cupboards that will be installed. At the moment no photo's but I'll have them for the next write up. As well the Surveyors were here so I am only awaiting their paperwork before I can go for the final inspection.
Well Fall is here and with that comes cooler weather and rain. Unfortunately the rain is coming in showers and not gentle soaking rain which the farmers need. I guess now we'll have to start thinking about getting ready for Winter. Well until next time stay warm and dry.
Harold
Thursday, 1 September 2016
I hate getting old.
Well I guess I should clarify the title. For the last week I've been plagued with lower back soreness such that I could not go to work this week at all. Also means I've done very little around the house. Sitting or lying around doing nothing is monotonous and boring. Oh well I now have some stronger Dr prescribed drugs hopefully they will help.
With that in mind I might as well update you what has happened this past month. Well during the first two weeks I essentially made and then installed the vanity for the spare bathroom. I made this all from Maple hardwood and Maple plywood. I also used Baltic Birch for the door insert panels. I started by making a 7ft tall by 2ft wide linen tower. This unit has one fixed shelf in the middle. In the pictures below you can see the basic carcass with a lot of clamps holding on the face trim I just glued on with biscuits. The carcass is maple plywood and the face frame is maple hardwood. The third shot shows it during a trial fit in the bathroom. Once I marked what needed to be removed for a tighter fit brought it back to the shop for work and varathaning.


We then commenced work on the drawers and doors. The drawers are a Baltic Birch box with a hardwood maple face and the doors are 3" wide rail and stiles with a 1/4" Baltic Birch plywood panel. Here are some pictures during construction and after installation. Everything was coated with Polyurethane. I sprayed the drawers with water based poly and the doors and drawer fronts got three coats of the oil modified polyurethane I've been using throughout the house.


I also took the time to finish spreading out the decorative stone around the house and to request a final survey from the surveyors for use during final inspection. Here is a picture showing the last of the stone spread out.

With this all done I finished the last of the door trim and baseboard in the house. We also cleaned up the spare bedroom and made up the spare bed for future use. Towards the middle of the month I had the countertop people in to template the vanity top and hopefully we can get that installed either next week of the week after. Once their finished then I can hook up the sink and installed the towel bars etc. Finally last week I spent time making up some doors for the kitchen cabinets, particularly the 4 doors required for the lower cabinets. These are plain flat doors made up of glued up solid cherry wood. I decided this time to join them using my finger joint bit in the router table. We then cut them to size and did a trial fit in the kitchen. Once we happy with the fitment we uninstalled them and brought them back to the garage for 4 coats of polyurethane. Here are some photos showing the finger joint setup and then the doors preliminarily installed and then final installation.


So now all I need for the final inspection will be the survey papers. Hopefully these will come soon.
That's all for now and we'll see you again in a month or so.
Harold
With that in mind I might as well update you what has happened this past month. Well during the first two weeks I essentially made and then installed the vanity for the spare bathroom. I made this all from Maple hardwood and Maple plywood. I also used Baltic Birch for the door insert panels. I started by making a 7ft tall by 2ft wide linen tower. This unit has one fixed shelf in the middle. In the pictures below you can see the basic carcass with a lot of clamps holding on the face trim I just glued on with biscuits. The carcass is maple plywood and the face frame is maple hardwood. The third shot shows it during a trial fit in the bathroom. Once I marked what needed to be removed for a tighter fit brought it back to the shop for work and varathaning.


Once the carcass was installed I moved on to building the sink base cabinet. This was built using the same material with a bank of drawers either side of the central sink. Here is a picture of the cabinet under construction and in place for fitment. Once it was fitted I left it there and trimmed it out in place. After sanding the trim I varathaned it in place.


We then commenced work on the drawers and doors. The drawers are a Baltic Birch box with a hardwood maple face and the doors are 3" wide rail and stiles with a 1/4" Baltic Birch plywood panel. Here are some pictures during construction and after installation. Everything was coated with Polyurethane. I sprayed the drawers with water based poly and the doors and drawer fronts got three coats of the oil modified polyurethane I've been using throughout the house.


I also took the time to finish spreading out the decorative stone around the house and to request a final survey from the surveyors for use during final inspection. Here is a picture showing the last of the stone spread out.

With this all done I finished the last of the door trim and baseboard in the house. We also cleaned up the spare bedroom and made up the spare bed for future use. Towards the middle of the month I had the countertop people in to template the vanity top and hopefully we can get that installed either next week of the week after. Once their finished then I can hook up the sink and installed the towel bars etc. Finally last week I spent time making up some doors for the kitchen cabinets, particularly the 4 doors required for the lower cabinets. These are plain flat doors made up of glued up solid cherry wood. I decided this time to join them using my finger joint bit in the router table. We then cut them to size and did a trial fit in the kitchen. Once we happy with the fitment we uninstalled them and brought them back to the garage for 4 coats of polyurethane. Here are some photos showing the finger joint setup and then the doors preliminarily installed and then final installation.


So now all I need for the final inspection will be the survey papers. Hopefully these will come soon.
That's all for now and we'll see you again in a month or so.
Harold
Sunday, 31 July 2016
Nearing the end of the journey
Well I guess it's time for another update. We had a reasonable month and hopefully by the end of this coming month I might have everything done that is required for the final building permit. If that happens it will be the end of a two year journey from start to finish. So let's update you as to what happened this month.
It was not an auspicious start to the month. I began by having a fellow over to finalize plans to install solar panels on my garage roof. Before he came over I decided to pull a stronger rope through the conduit I had installed when we backfilled the foundation only to find out that somewhere there was a blockage and the rope could not be pulled through. I determined that the blockage was underneath the rear deck so we bug down to the foundation footings on the east side where the pipe was and then dug down to the pipe on the south side which thankfully was only 3ft deep. We then spliced in a couple of pieces to bring the pipe to the top and then ran conduit around the deck to allow the future wire to be pulled through. This was a messy job but by the end of the day it was done. Here are some pictures showing the two holes as well as the outcome of the work. At a later date I installed the PVC conduit around the deck connecting the two pieces of black Big O pipe.


Finally last week the one of the local stores, Canadian Tire, had a sale on some patio furniture. I picked up this teak table with 6 plastic wicker chairs for my deck. I now have a dining table on the deck that will get it's inaugural usage today.
Well as mentioned for the coming couple of weeks I will finish the door and trim, install the last of the landscape stone, and start work on building the vanity for the spare bathroom. I will also get the surveyors in to do the final grade survey so that I can get my final inspection done.
Well until next month have a great summer and enjoy your vacations.
Harold
It was not an auspicious start to the month. I began by having a fellow over to finalize plans to install solar panels on my garage roof. Before he came over I decided to pull a stronger rope through the conduit I had installed when we backfilled the foundation only to find out that somewhere there was a blockage and the rope could not be pulled through. I determined that the blockage was underneath the rear deck so we bug down to the foundation footings on the east side where the pipe was and then dug down to the pipe on the south side which thankfully was only 3ft deep. We then spliced in a couple of pieces to bring the pipe to the top and then ran conduit around the deck to allow the future wire to be pulled through. This was a messy job but by the end of the day it was done. Here are some pictures showing the two holes as well as the outcome of the work. At a later date I installed the PVC conduit around the deck connecting the two pieces of black Big O pipe.


The following day I started making a small coffee table out of the leftover Fir boards for use on the deck. Once complete it received a coating of Teak Oil before being used. As well I picked up a load of red stone to continue working on placing this around the house on top of a weed barrier. I still need one more trailer load to finish this job which I will do later this coming week. Here are a couple of pictures showing the Fir boards prior to final glue up and the result of installing the decorative stone.


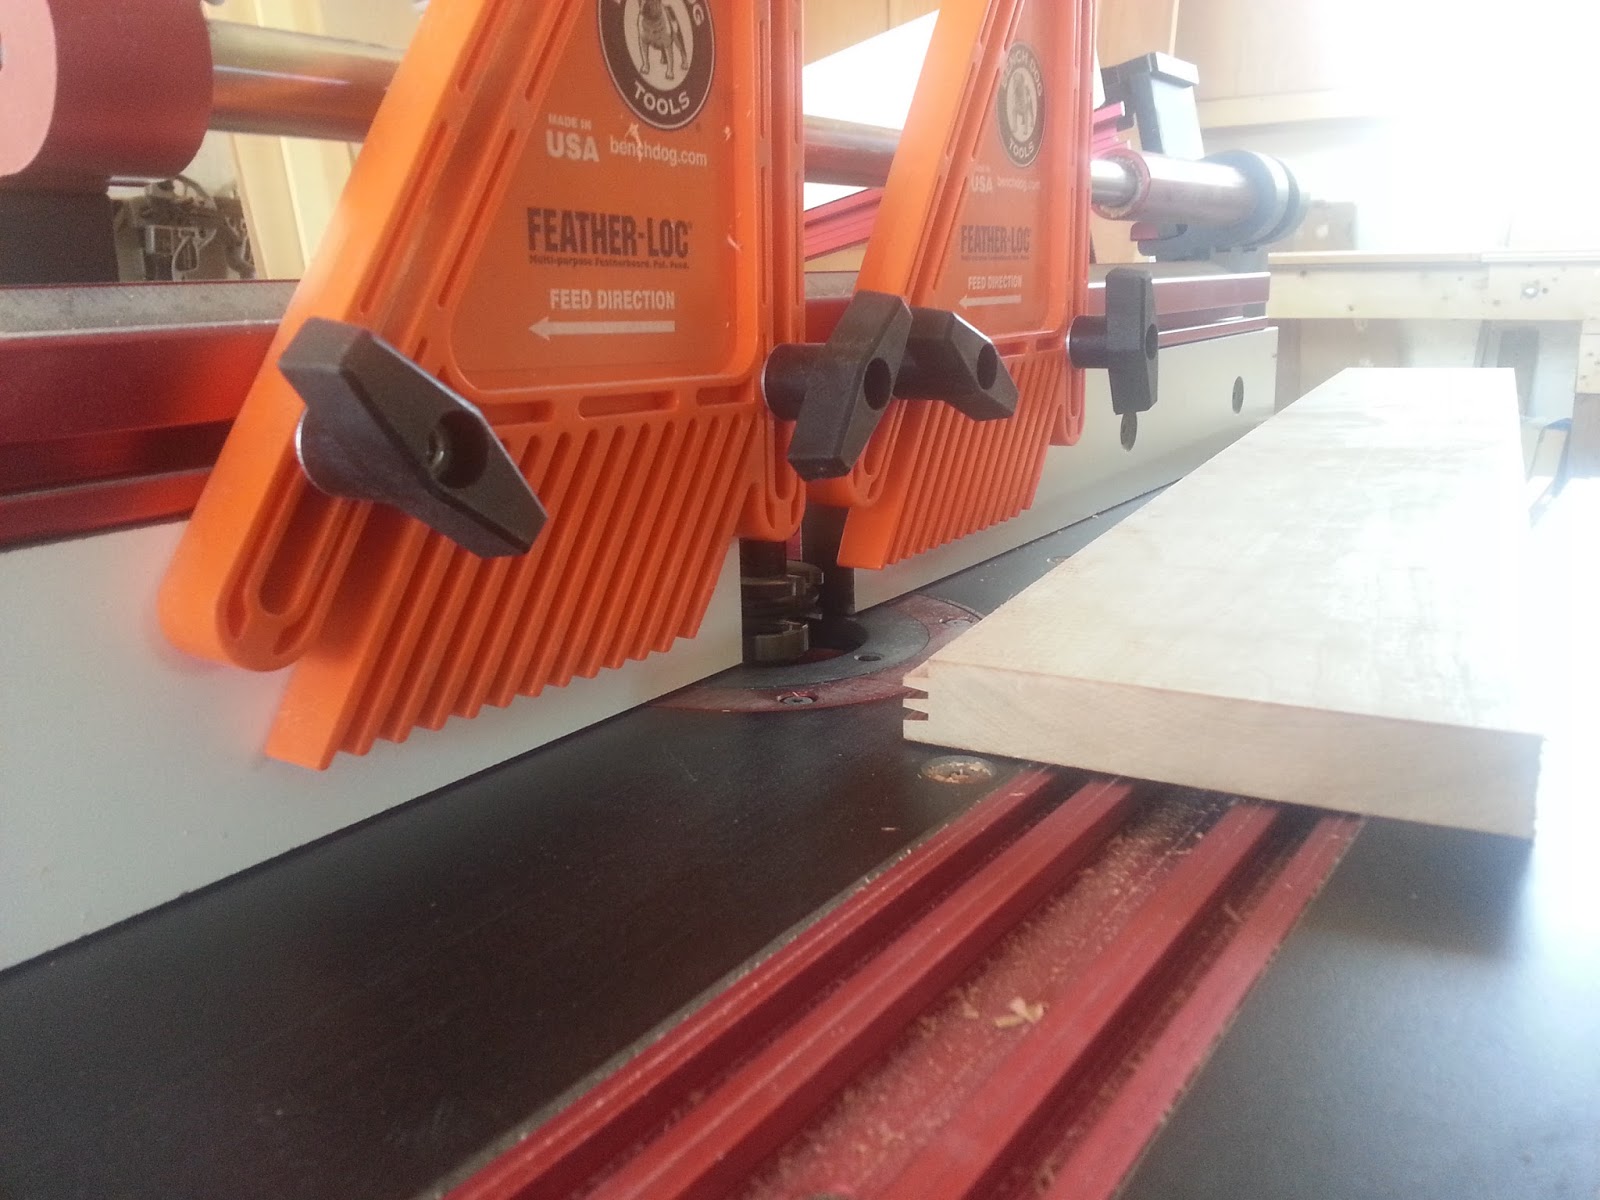
So for the following week we spent a lot of time working on the Router table. I needed to slot grooves on all the stiles of the door a 1/2" deep and I needed slots on one side of the rails 1" deep. I then needed to cut out the tenons on the end of the stiles to fit into the grooves on the rails. I did this all on my Jessum Router table using a 1/2" spiral router bit. The beauty of this table is that it has an indicator on it for the raising of the bit that is calibrated in thousandths of an inch so you can get really precise. Here is a picture showing the table. In the second photo you can see me starting to cut out a tenon on one of the stiles.


After all the boards were routed we could start on the glue up. Before we glued up all the boards I jointed a slight angle on one of the rails that would house the door hinge. I then routed out the hinges using my template and then took the first rail inside to test fit the piece. It fit like a charm so back to the shop to carefully fit all the pieces. This also included cutting out the panels from Baltic Birch plywood. Once these pieces were all fitted in we took the door apart and then started the glue up process. I basically did one door a day leaving them in the clamps for at least 12hrs. Once the first door was done we took it into the house to test fit it. All that we needed to do was trim a little of the one side of the door to get a nice fit. On the whole all 5 doors went pretty well. The worst one was the door from the spare bedroom to the bathroom. This opening was out of kilter and I thought I had installed the jambs nice and level but we ended up with a slightly bigger gap near the bottom half of the door and the jamb than I would have like. The door stop should still cover this but it could have been better. Here are some shots of the process and the first hung door.


Once the doors were installed we could start painting them. The two doors into the bathroom have received 3 coats of white semi-gloss and the door into the rear entrance area has received 4 coats of orange paint. Over the next week I will paint the two bedroom doors. Once the paint has dried will finish installing the door trim and then work on installing the last of the baseboard around these door areas. Once that is done all that will be left for upstairs trim will be trimming out the front entrance door and the associated trim in the front entrance. Here are a couple of pictures showing painted doors.


Well as mentioned for the coming couple of weeks I will finish the door and trim, install the last of the landscape stone, and start work on building the vanity for the spare bathroom. I will also get the surveyors in to do the final grade survey so that I can get my final inspection done.
Well until next month have a great summer and enjoy your vacations.
Harold
Friday, 1 July 2016
Happy Canada Day
Well it's the First of July and for us here in Canada it is Canada Day. No work lots of things to do around town and Fireworks this evening. So I thought it was a good time to update you on what has been going on around here. One good thing is that as of now, knock on wood, all my appliances have been repaired/replaced and they all seem to be working smoothly.
Ok onto the house work. At the beginning of the month I spent some time installing some Casing around the interior door frames that were installed last month. Since I was short some trim I then picked up what I was short as well as door stop material and spent some time painting these pieces. Somehow I never got around to installing it yet so I guess that is still to come. I then started work on installing the trim on the front and rear deck. This is basically more of the rough cut Fir that I am using to cover up the beams. Here are some pictures of the front and back decks. I've cut some small strips of 3/4" by 3/4" Fir from the leftover and will cover the cracks in the corners at a later date.


Once that was done spent a little time forming up a small pad for in front of the man door into the garage and poured some concrete. Here is a picture of this job.


Next we took the time to build a small fence just beside my Air Conditioner. This will do two things, one baffle the noise a little towards the neighbour and also make it a little less visible from the street. This was just two 4by4 placed in the ground with dirt tamped around them and then some cedar deck boards on either side of a pair of 2by4's between these posts. This was then topped with a nice piece of cedar 2by6 on the flat. Here is a photo of the fence rail.


Ok onto the house work. At the beginning of the month I spent some time installing some Casing around the interior door frames that were installed last month. Since I was short some trim I then picked up what I was short as well as door stop material and spent some time painting these pieces. Somehow I never got around to installing it yet so I guess that is still to come. I then started work on installing the trim on the front and rear deck. This is basically more of the rough cut Fir that I am using to cover up the beams. Here are some pictures of the front and back decks. I've cut some small strips of 3/4" by 3/4" Fir from the leftover and will cover the cracks in the corners at a later date.


Once that was done spent a little time forming up a small pad for in front of the man door into the garage and poured some concrete. Here is a picture of this job.

Then in the middle of the month my Brother and his family came down and we cleaned off the old shingles from Mom's garage and reshingled it. If you want to see a short video on this you can check out this link on my Brothers Youtube Channel
The next thing we did on the house was to continue working on the rear deck railing. So off to the local lumber yard and pickup some clear cedar lumber. Let me tell you it looks great but it is not cheap. The railing is basically two 2by4's between the posts with one 2by6 on the flat on the top 2by4. We then screw square balusters to the 2by4 with 3.5inches between balusters. The code here states that for any deck more than 24"above the surrounding area must be railed and max spacing between balusters is 100mm or appox 4". Here are some photo's showing the deck railings as well as the stair railings. The rest of the railing will be built in July so that it is on the next months billing cycle.


Next we spent a few days sifting dirt and spreading it out behind the rear deck towards the garage. Once we had enough dirt there we leveled it out rolled it down and then spread a little more dirt to bring it up to the level I wanted. Once it was all down we scratched the top with a rake spread some grass seed, raked it again, spread some more seed, raked it again, spread some more seed, raked it again and then rolled it. We then spent 5 days watering it off and on and we now have some green grass fuzz starting. I'll continue to keep watering it until the grass is well on it's way. Here is a picture showing the area I am talking about.

Now I had to go back to a specialty wood store near the middle of the month to pick up some for fir 1by6 for the deck trimming. While I was there I noticed a really nice piece of Peruvian Black Walnut they had. This was 20"wide by 12ft long. I thought this would be a great piece for the eat in bar top area in the kitchen. As the cost was only 250$ I decided to take it. Once we started working on it the first thing we needed to do was cut one straight edge down the 12ft. So we took some string stretched it from end to end and marked down a straight line trying to save as much of the width as possible. I then laid down a straight edge clamped it down and used this to guide my skilsaw. Once we had one straight edge we could use the table saw to cut off two 1.5" wide strips that I would glue to the bottom along the edge to give the impression of a thicker top than the 1" thickness that it was. Inside I screwed two pieces of 5/8" plywood to the top of the pony wall and then built three brackets from the left over walnut. These were varathaned and then installed before the top was installed. While this was going on we glued and screwed the small strips to the underside of the top in the garage and then rounded it over and sanded it all down before bringing it into the house for installation. I installed it onto the top of the plywood and then drilled and countersunk 6 holes to secure it to the top of the wall and then screwed up from the bottom of the plywood on the overhang to secure the top in place. We then plugged the countersinks with small pieces of walnut wood. Sanded the plugs smooth and varathaned the top. Here are some pictures showing the whole affair. The last picture is after one coat of varathane. I have now placed 4 coats on it and will most likely do at least one possibly two more coats.


Lastly we spent some time in the shop with my new/used jointer preparing the lumber for the 5 interior doors. First we jointed one face side smooth, then we planed the boards to the finally thickness. I then jointed one edge square to the face and then cut them down to the required width on the table saw. Here is a picture of all the rails and stiles standing awaiting the next procedure.

So for the month coming up I plan on trying to finish the doors and get them installed. I also want to finish the deck railing, spread some more stone around the house and possibly start on digging the last trench for a small retaining wall along the driveway between me and the neighbour. I guess you'll find out next month as to how I did. Until then for all you Americans Happy 4th of July and see you again in a month.
Harold
Subscribe to:
Posts (Atom)