Saturday 26 December 2015

It's finally starting to feel like home

I finally had the chance to move some more furniture into the house and it makes it look and feel more like a home. Unfortunately I did not win the big lottery here the other night so I guess I need to continue to go to work to make money. Would have been nice to just laze about with all that lottery money in the bank. Oh well just wasn't my time I guess.

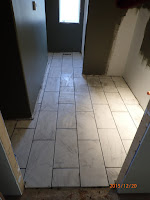
So last Sunday we spent time grouting the tiles and then cleaning all the grout off when it had dried. For those that don't understand you force the grout into the cracks between the tiles and then wait about 20 minutes and with a damp sponge you wipe up as much excess as you can. You continually need to have clean water and I think I went through 8 buckets of water before I finished the first cleaning. Then about 2hrs later once the grout has dried some more you go back in and with a damp sponge again clean the tiles to ensure no grout is left on the tile surface. Then the following day I did it once more just to make sure the tiles were clean. After this was done we started installing the bamboo flooring in the bedroom. The flooring I'm using comes from a company called Teragren out of Bothell Washington USA. It is highly recommended and one of the better ones for being green and manufactured to close tolerances. This is a "click lock" system meaning the pieces interlock together and no nails or glue is required. I carefully cleaned the floor and then laid down a 2mm thick foam flooring pad. Then we laid down the first row of boards. The boards all interlock at the ends so you lay the first board down and then with the right side of the second board raised slide it into the groove on the board on your left and then carefully lay the righthand board down. When you do this the two ends lock together. Once the first row is done you install the first board of the second row. You do this by keeping the side of the board closest to you raised and then slide the side away from you into the groove on the board already laid down. You then carefully lower the back edge down to the floor. You then take a rubber non marking mallet and hammer down the seam from one end to the other to lock the two pieces into place. Then you carefully raise the far right corner of the board you installed and just like the first row insert the next board into the end groove. Once you bring this down the new board will be about 4mm away from the groove in the row already down. You gently nudge/tap with your rubber mallet to push the board into the groove. Once you get it into the groove remove the spacer you used to raise the one corner and carefully hammer down the seam locking the new board in place. Most of the time you had to go back and hammer the previous board again because it became loose. As well I figured out that if you locked the end pieces of two boards together at the beginning of a row and then inserted the two pieces into the boards already laid you prevented that from happening about 50% of the time. The floor moves a fair amount when you are working on the first few rows so you need to ensure you either have spacers against the wall or after three to four rows ensure you move the floor to the correct spot and then be carefully installing the next few rows. After about six to eight rows the floor becomes heavy and rigid enough that it doesn't move around. Once you get into the groove it actually goes quite quickly and the floor looks great and you hardly see the longitudinal seams. So here are some pictures the first two are of the tile floor after the grout was installed and then after the first wipe down. The third picture is of the bedroom floor after about half was done.


On Tuesday we finished the bedroom floor and then proceeded to work on the living room floor area. Again this went exactly the same as mentioned above. The runs were longer and it actually went relatively quickly once we got away from all the initial cuts along the wall and the heating ducts. Here is a picture showing the finished bedroom and the start on the living area flooring.


On Christmas day I finished off the living area floor in the morning and in the afternoon spent it with Mom and the Sister and Brother in law at their place. So a nice relaxing day in other words. Here's a picture showing the flooring then as it sits today.


Well today being Boxing day I could have gone out to all the sales but that's not me and right now I don't need to be out there looking at stuff  I don't need. So we took the time to bring in the last of the furniture from the garage so that one I can start work on setting up the garage and two I can live a little easier in the house. So we brought in the living room furniture the dining room furniture and the office furniture. Here are two pictures showing the living area as it sits right now. I still need to bring up the dining room chairs from the basement but there's no rush on this. Oh the crate sitting in the pictures with the big arrow is the grandfather clock I built years ago. It will most likely go in the hallway once the flooring is completed. The third picture shows the bedroom window trimmed out. I took a few minutes this evening to quickly trim out the bedroom and bathroom windows. Tomorrow I'll probably start on the baseboard in the bathroom and start painting the baseboard and quarter round for the bedroom.


Well that's where we sit right now. I don't think I'll finish the floor until the kitchen counter gets installed about one to two weeks into the new year. For now I'll finish some trim in the bed and bathroom. and then look at work on installing the door from the bedroom to the bathroom. The final four doors cannot be installed until all the flooring is done. So I now need to make up a jig to router out the hinge recesses in the door and jamb. 

Well I wish all of you out there a Very Happy New Years Eve and please don't drink and drive if you've had a little to much New Years cheer. Until next week stay safe.

Harold


Saturday 19 December 2015

Going broke saving money

When I was in the military we had this saying "going broke saving money". This usually occurred when we went to Germany to our base there. What with the exchange rate and the lower cost of electronics over there we quite often bought a lot of electronics. It was cheaper so we saved money however we quite often over bought or upsized because of this and therefore spent more than we should have. Oh well we still got great stuff. Well the same occurred to me today. Went to the local Lowes to buy some items for the closet organizer that I still needed for the spare bedroom. Well while there looked at lights and ceiling fans for the spare bedroom, living room and spare bathroom. Saw some nice lights for the bathroom so bought them. Then the attendant said he was lowering the prices on some ceiling fans. So I said, any Hunter Douglas fans, he said yup. Looked at the ones he had reduced and ended up buying the ceiling fans for the spare bedroom and the living room. The bedroom fan was reduced approx 30% and the living room fan was reduced by 50%. Then to top it off they had a sale where we saved the sales tax which meant another reduction of 13%. By the time I was finished the credit card took a 700$ hit. Oh well I needed the stuff and I did end up saving a fair amount of money so I went "broke saving money". Ok enough of this on to the work that was accomplished this week.

On Sunday morning we mixed up a bag of thinset mortar to lay tiles in the bathroom. By the time the bucket was empty about a 1/3 of the tiles had been set. So on Tuesday we'll pick up another 2 bags of thinset and finish the job. Here's a photo showing the tiles set today. This was actually the harder area as we went around the toilet and the water line. This area is to the left of the picture in the small cubicle area.


So on Tuesday we picked up the two bags of Thinset and then proceeded to finish working on the tile floor in the spare bathroom. After about 4-5hours of work the floor was done. Now to leave it alone for a few days until I get a chance to grout the floor. Once this was done we spent a few minutes working on installing the coat hook rack in the master bedroom closet. Actually installing the coat hooks was a little frustrating as the first screw snapped off at the last few turns. Then another screw just stripped out. I hate these Philips screws for one and then to have them made from softer steel is even worse. Oh well that what you get when you buy the cheaper stuff. Here are a couple of pictures showing the floor completed and the coat hooks installed. I actually got quite lucky with the tiles just had two left over after all was said and done.


 Wednesday became a bit of a dirty day. First we spent some time working on the shelf in the laundry room until I realized one of the pieces was to short so I needed to make a new one. Then we got down on hands and knees and spent the rest of the day cleaning and sanding the floor down in preparation for laying down of the bamboo floor. Used my belt sander with a coarse belt and then had the shop vacuum hose following it just to try and keep the dust down. I also had the door open with a large fan blowing outdoors to try and get most of the airborne dust out of the house. That will be one big relief once the floor is down, a lot less dust and an easier floor to clean.

So today was a big day. After spending all that money at Lowe's we came home to start installing all that stuff. First we went into the bathroom and installed the two LED ceiling lights and finished off installing the wall lights that will be over the vanity. Here are two pictures showing these installations.


Once complete we went into the spare bedroom and finished the installation of the Rubbermaid closet organizer. This was followed up by the installation of the ceiling fan. Once again we got turned around on the wiring. When I wired the house I installed two three way switches to control the fan and the light. One pair by the bed and one pair by the door. This was followed up with a three way wire to the ceiling fixture. I ran the black wire from the light switch and the red wire from the fan switch. The ceiling fan came with black and blue wires so I assumed the blue one would be the fan wire. After installation was complete and the circuit breaker turned on I tested the system. Wouldn't you know it the fan switch controlled the light and the light switch controlled the fan. So turn everything off and switch the blue and black wire around. Then it worked as it should. Here are some photos showing the closet and ceiling fan.


Next project was to install the ceiling fan in the living room. This time I made sure to wire it up the same as the other fan. However this time I was in a rush and forgot to install the upper box cover. Luckily I caught it right away so on a little time was lost. This one has only one switch so the pull chains will actually control the light and fan on this one. Here's a photo showing this fan.


Then we went onto the last job for the day. This would be the installation of the drawer fronts in the kitchen. We started by making a small jig up to help drill the holes for the handle installation. This was simply a piece of 3/4" stock screwed to a piece of 1/4" plywood 3ft wide by 12 inches deep. I would use this on the front of the drawer front to use to drill the holes for the handle screws. I carefully laid out a pair of holes 12" on centre for the top drawer fronts. The first pair were 3-7/8" below the top. The second set was 5" below the top and the final set was 6-3/4" below the top. I then used the first row to drill all four top drawer fronts. Once this was done we drilled out the second row and then finished off with the third row. Once they were all drilled out we mounted the handles. The top row was easy as the fronts were already installed. With the second and third row we used the drawer front as the template to drill the holes into the drawer box. I clamped a small board in front of the spacer between drawers 1/2" below the top of the spacer. I then set the drawer front on this board and ensured it was centred from left to right. I also checked to ensure there was a 1/2" space between the top of this drawer front and the bottom of the drawer front. It they all lined up we drilled out the two handle holes. Then we installed the handle and closed the drawer. If it still lined up we opened the drawer and then proceeded to secure the drawer front to the drawer box with some wood screws. For the bottom drawer we just used a 1/2" spacer between the bottom of the middle drawer and the top of the bottom drawer, again lined it up and drilled out the handle holes. It actually went quite smoothly and the finished look is as I expected. I'm quite happy with how it has all turned out so far. Here's a few pictures showing this all. First picture shows a drawer front and the drill jig. The tape covers up the holes I was not using to ensure I did not drill out the wrong holes for the wrong drawers. The last two pictures show the finished cabinets after all the drawer fronts are installed. This also includes the drawer above the refrigerator area.


Well that's were we sit as of now. Tomorrow I plan on installing the grout in the tile floor and then starting on the bamboo floor in the spare bedroom. After that we'll see what happens. Oh the counter top guy was around and has templated the counter for installation. Just like a lot of companies they are closing down for the holidays and will not reopen until the new year so it looks like the counter will not be installed until the second or third week of January. Oh well just gives me more time to save up the money for it.

Anyway Merry Christmas, and a Happy New Year to each and everyone of you.

Harold


Saturday 12 December 2015

Kitchen cabinets oh so close to being done

Well we're just a little bit away from having completed kitchen cabinets. All that I need to do is install the drawer fronts and when the handles arrive install them as well. Next week the countertop company comes by to template the install and hopefully a few weeks later the countertop will be installed. As for the doors they'll come next year once the weather gets a little better. Lets face it I don't need doors to have a usable kitchen. So anyway lets see what we did this week.

On Sunday we spent the morning varathaning the cabinets with the fourth coat of varathane and once it was dry we started installing the drawers. Before evening arrived I had managed to install nine of the twelve drawers. Then we had to stop so I could clean up and go to the company Christmas Dinner. Had a lovely time and a great meal. First picture shows the first bank of drawers installed and the second picture shows the status at end of day.


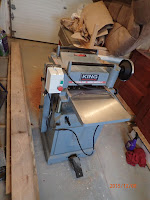
 So on Tuesday we started the day by moving the leftover sand from the masonry work. I wanted to move this so we had easier access to the garage as later in the day a fellow from work was delivering a 15inch thickness planer. I needed this planer to clean up the drawer fronts and the fellow at work did not have a 15inch planer he only had a 13inch planer. So by end of day Monday I had bought a new thickness planer from work and made arrangements for delivery. Once delivered it took about an hour to clean up all the grease and protective material and to finish setting it up. Once it was all done we ran a test piece through and then ran the 8 drawer fronts through that needed planing. While waiting for the planer delivery and after moving the sand we managed to finish installing the last three drawers. I like having full extension drawer slides however I do find them a little more unforgiving in regards to drawer and cabinet fitment. I took a while to get the drawers all fitted and moving. A couple of the drawers might need a little more work to get them to move a little easier. So here is a picture showing the new sandpile beside the garage, then we move into the garage for a picture of the new planer. Finally we have a photo showing the 8 drawer fronts stacked up after going through the planer.


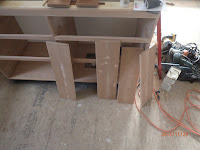
On Wednesday we varathaned the drawer fronts twice. We also spent some time installing some of the window trim in the last two windows. After this we started working on building the drawer and installing the supports and drawer slides for a drawer that will sit above the fridge where you would normally have another small cupboard. This drawer will remain open so whatever is stashed up there will always be visible. Again we needed to work with this since there was a slight taper between the wall and the side of the cabinets. Lastly we prepped some trim to be used as a coat hook rack in the master closet and a shelf that will be situated above the washer and dryer in the back entrance. Here are some pictures showing this. First picture shows the side supports and drawer slides above the fridge area. Second photo shows the drawer that will go there after glue up and sitting in clamps. Final pictures shows the pieces for the coat rack and shelf after their first coat of white paint.


On Friday we managed to paint the trim and varathane the drawer fronts after work. 

On Saturday we started by putting the final coat of varathane on the drawer fronts and then putting the third coat of paint on the trim pieces. I then setup the tile saw and proceeded to work on dry fitting the flooring tile for the spare bathroom. These are white porcelain tiles with a marble looking finish. They are also 12inches by 24inches so are not small. I dry fitted the tiles around the toilet and shower area before stopping. I then laid out the heating cable in the Ditra membrane. I had to be a little creative near the end however the entire length of cable fit in. Since you cannot cut this cable you buy it for the square footage you plan to cover. Then you are restricted to ensuring the cable is no closer than 3inches to walls, cabinets and itself. As well it needs to be 8inches away from heating ducts. I now have enough tile cut to be able to start installing this. Not sure whether we'll do this tomorrow or wait until Tuesday. Here is a photo showing the cable laid out in the Ditra membrane. As well you can see some of the tiles lying down in the area where the vanity will go awaiting installation. 

Well that's it for now. Next week I hope to be able to state tiling is finished and maybe we've started to work on the floor install. If not I'll be installing my floor during the week of Christmas. Until then enjoy the reasonably mild winter we're having so far.

Harold


Saturday 5 December 2015

I'm tired of Varathaning

Well spent a lot of time this week Varathaning the kitchen items. It becomes monotonous and boring very quickly. Unfortunately it needs to be done. Doesn't help when you've got 12 drawers about 4ft square that need about 4 coats. Oh well it's almost done. So lets delve right into the work that was done.

On Sunday we spent time putting the 3rd and 4th coat of Varathane onto the shelves for the upper cabinets. As well we spent time preparing the drawer fronts for the upper set of drawers on the lower cabinets. These were easy to do as they could be made up with the leftover cherry I had on site. As for the remainder I needed to buy some more cherry which would occur on Tuesday.

On Tuesday we installed the shelves for the upper cabinets and then also installed the small trim piece where the cabinets met the bulkhead. This was just a small piece of cherry cut down to a 3/4 by 1/4 inch size. Here are two photos showing the upper cabinets and then a close up of the trim.


We then spent some time finish sanding the base unit and cleaned it up before proceeding to give it its first coat of varathane. Once this was done we spent some time varathaning the bottom of all 12 drawers. Nice thing with this varathane and the temp in the house was that once the first coat was done I could start all over and proceed to paint the second coat of varathane on the bottoms of the drawers. This will be all the varathane the bottoms will get. Here's a picture of the drawers spread out over the kitchen upside down drying after their second coat of varathane.


I the moved on to preparing the Ditra heat membrane for installation in the second bathroom. Essentially this was cutting and dry fitting the pieces on the floor prior to installing them permanently with modified thinset mortar. Once that was done we could go back to the drawers and start varathaning the inside of the drawers before we called it quits for the night. So here's a picture showing the Ditra membrane trial fitted and then a picture showing the drawers drying after their first interior coat.


So on Wednesday we started by mixing up a 22kg bag of mortar mix and then installing the Ditra heat membrane using a 1/4 by 1/4inch notched trowel. After about 30 minutes the installation was complete. And with the exception of about 3-5 ounces of mortar that ended up on my jeans the installation went quite smoothly. We only had about 1 cup of mortar left over at the end of the job. Once we'd cleaned up from this job we then proceeded to lightly sand the insides of the drawers and give them their second coat of varathane. While the drawers were drying we proceeded to cut the boards of cherry down to the size required for the remaining drawer fronts. My drawer fronts are 14in 10in and 7in. As I was using 1by5 or 1by6 cherry, this required laminating multiple pieces together for the drawer fronts. Using the clamps at my disposal I could glue up 2 drawers at a time. Once the pieces were all cut out we glued up the first pair of drawer fronts and then proceeded to give the cabinet frame its second coat of varathane. Once that was all done we actually still had time to give the drawers their third coat of varathane on the insides only. Hence the comment I'm getting tired of all this varathaning. Here are a couple of shots showing the glue up of the drawer fronts.


I did take the time to glue up two more sets of drawer fronts over the next two days after I got home from work.

On Saturday we first took the time to lightly sand and then varathane the cabinets with their 3rd coat. After that was done we gave the drawers their 4th coat of varathane on the interior sides. This hopefully will be the last coat for the drawers. I'll decide once they are fully dried. We then spent some time showing the house to the brother and his family as they came down for 24 hrs to visit with Mom and the rest of the family. After the visit was over we spent some time sanding down the laminated drawer fronts. When gluing them up I wiped off most of the glue squeeze out however we still needed to sand some of the glue away as well I needed to smooth down the panels. Unfortuantely I did not see this until I'd glued them up but one of the boards was a 1/16 of an inch thinner than the rest for there was a height difference that I needed to smooth down. Since I don't have a thickness planer this required me to spend some time working on them with a belt sander and a fairly coarse grade of sanding belt. Although they are now smooth I'm not entirely happy with the finish so I might break down and buy a thickness planer to plane them down to a uniform thickness. I'll also check with a co-worker to see if he has a planer I might be able to borrow. Later in the afternoon just prior to writing this up we spent some time down on hands and knees installing more screws in the floor in the kitchen area and then lightly sanding the plywood in that area as well. This is in preparation for installing the flooring at a later date. I plan on rescrewing the entire floor and ensuring the floor is smooth with not bumps or lumps from paint of drywall mud before laying down the engineered Bamboo flooring. 

Well that's it for this week. Tomorrow I have a Christmas party from work to attend and then we'll see what we do for the remainder of the week. If I decide the drawers do not need more varathane then I will start to install them on Sunday and finish this job off on Tuesday. Once they are installed and the upper drawer fronts are installed I'll be able to get the counter top installed. The tiles for the bathroom will show up on Friday so we'll most likely install them on Saturday. In between this all I'll be cleaning up the house moving stuff to the garage and preparing the floor for flooring. With luck the furniture will be in by Christmas.

Well until next week " See Ya"

Harold


Saturday 28 November 2015

Lower Kitchen cabinets are getting closer to completion

Well things have progressed, maybe not as fast as I would like but sometimes you need to take your time. Especially when custom building things. Each item needs to be custom fitted and this all takes time. What do they say "you can't rush a good cook", well maybe I'm not a great cook, but I'm not starving either. So lets get on with it and see what we did this week.

On Sunday we finished the board and batten on the side porch. The only thing left to do is give it a coat of Thompson's water seal. However this will need to wait until next year as I don't think we'll have the weather to properly paint a coat on it. After this was done we spent some time cutting out the shelves that we still needed to make for the upper units. As well I cut out some solid cherry to face the plywood shelves. Lastly we spent some time sanding down the lower cabinet carcass after we'd filled in the nail holes. I was hoping to get this done but for some reason I broke two sanding belts for the belt sander and did not have another replacement. Oh well we'll buy some more on Monday at work. Here is a picture showing the board and batten.


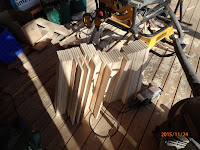
So on Tuesday we started by cutting out the drawer pieces. So I have 4 banks of drawers each with 3 drawers. Each drawer has 4 sides. Each side needs three cutting operations after being cut to size. First we need to cut a 1/4" groove in the bottom for the drawer bottom. Then the sides need two grooves cut at each end to accept a "tongue" from the front and back pieces. Then the front and back need a rabbit cut so as to create a tongue to fit into the sides. Simple you say however I do not have a dado blade setup to cut out the groove in one shot so each piece (48) needs to go through the table saw three times so that I can cut out the 1/4" grooves then the sides (24) need to go through six times to cut out the grooves at either end and then the front and back (24) need to go through 4 times to cut out the rabbit at each end. Needless to say we spent a little bit of time at the table saw. Oh let me add that before that I also needed to do some belt sanding as I free handed the cutting of the sides since they are not rectangular. My side taper down so I needed to clamp up eight sides so as to be able to sand smooth the angular cut. Here are some photos showing all this. The first one shows me free handing the taper cut with my cordless skilsaw, second we are sanding down this edge so all eight pieces are symmetrical. Then the third picture just shows all the pieces stacked up after all the milling was complete and the last picture shows the pieces stacked in front of their respective drawer stack.


On Wednesday we worked on the shelves for the uppers and started the glue up of the drawers for the lowers. Due to amount of clamps I could use, I could only glue up two drawers at a time. I left each pair in the clamps at least 4-5hrs so it took a while to glue them all up. I also could only glue up half the shelves at one time also so I had a little down time to contemplate future work in the house. Here are a couple of pictures showing the glue up process.


 Thursday and Friday after work we did some more glue-ups. This meant that by Saturday morning I only had two drawers left to do and all the shelves were done.

So today we started by sanding down all the shelves for the uppers and rounding over the edges. Once this was done we filled in any small gaps we found and left them to dry. Once the wood filler was dry gave them a final sanding and then cleaned them before applying the first coat of varathane. Since I managed to get this done around noon hour meant that I could put a second coat on later this evening. So the shelves are now drying as I write this article. I varathaned both sides and will not only varathane the top and front for the final two coats. Here is a picture showing the pieces laying out on the lower cabinets after their first coat of varathane. There will be two shelves per cabinet.


In between this all we glued up the last pair of drawers early in the morning and in the afternoon started work on rounding over the edges and sanding down the drawers. After each drawer was sanded I brought it inside for a trial fit. Three of the drawers needed a little bit more aggressive sanding on the sides so that they would fit smoothly in between the full extension drawer slides. As well it looks like a couple of the drawers will need some shimming under the drawer slides to ensure proper installation. I'll probably just use some washers to shim them out. Here is a picture of the drawers after this work and awaiting varathaning.


I thought about starting the varathaning tonight but when I opened the can that I had left over from my old house there was to much contamination from the can rusting out. So we had to dilute and throw out the leftover varathane and we'll just pick up a new can on Monday. I tend to use the water based product so disposal is not as problematic as the oil based products. I also spent some time cutting down some of the remaining cherry I had for drawer fronts. Now we just need to pick up a few more boards to finish making the drawer fronts. As for the cabinet doors I'll probably wait until next spring to do them in the garage. That is unless I get bored later this winter and decide to start them sooner. So for the next week we'll finish doing as much of the varathing as possible. Then we'll install the Ditra heat membrane in the second bathroom, finally I'll probably look at getting the countertop guy out to measure up for my countertops. 

So until we meet again have a great week.

Harold


Saturday 21 November 2015

Well I think that Dad would be proud of this weeks work

I say this because when Dad was a finish carpenter he would build the cabinets in the house as well as trim out the normal stuff. Of course this all stopped by the mid 70's but prior to that Dad built quite a few kitchens and vanities in the houses he worked in. Now these were not big houses they were just your normal starter homes for working class families. But in those days the finish carpenter not only hung doors and installed the trim but they built the stairs and all the cabinets in the house. So without further ado here's what we have.
On Sunday we worked on finishing all the side walls and getting them ready for installation. Unfortunately this led to some frustration as I could not find my 30" bar clamps to use to clamp the facing onto the wall pieces. I thought they might be in Mom's garage but they weren't and I still could not find them in my garage. Oh well I'm sure they'll turn up soon or later. Therefore I ended up using my 6ft clamps instead. It worked but was much more awkward in moving them around. While two sections were clamped up and drying we installed the 1/4" backing cherry plywood in the locations it would be needed. In the end this turned out to be just the sink cabinet as well as the two counter cabinets. All the remaining cabinets will be drawer units and do not need backing plywood. Once this was done while waiting for the glue to dry I decided do some more work on the battens and trim work on the side porch. I installed some of the Fir trim work and then finished up by installing the short battens over the doorway area. Here's a picture showing some of the side walls in laying ready with their facing strips. As well you can see the backing plywood installed. I used some filler pieces in the sink cabinet as the sink will cover the area not covered with plywood. Second picture shows the work on the Fir trim and Oak battens.


On Tuesday we started by completing the cabinet that will be between the stove and the refrigerator. This was a small 26" wide cabinet so would be a good place to start. I first carefully leveled and installed the two side walls and then began the process of trimming out the face. First we installed some small blocks on the side walls which would be behind the horizontal trim that would separate the drawers. I used a small framing square to insure it was 90deg to the front wall before securing it in place with a couple of screws and glue. I then installed the drawer separators. These pieces of wood were 1.5" wide. The lower trim on the bottom shelf was 3/4" and the upper piece under the counter is 2" wide. The three drawers are essentially 6", 9", and 12" deep. All the drawers will be of the same configuration just different widths. Here are a few pictures of what it looked like by the end of the day. First one shows the method of installing the small support blocks. Second one shows the completed cabinet and the third one shows the start of the cabinets across from the first one. The hole in the third photo is so that I can access my central vacuum system and can install my vacuum pan on the outer cabinet wall once the varathaning is done and the floor is installed.


On Wednesday we continued working on the cabinets and managed to get to the point that we had all the work done that could be done with the exception of the sink cabinet. The reason the sink cabinet needed to be last was that I could not install those last two cabinet walls until I had installed the shelf in the corner cabinets. I did not want to install the shelf until I had a chance to put on a few coats of varathane to the backing and area as it would be to difficult once all the pieces were in place. So by the end of the day all the pieces were ready and we could put the first coat of varathane on the two shelves as well as the inside of the corner cabinets and the sink cabinet. Once this work was done I proceeded to work on installing the dryer vent as I could not finish installing the battens until the vent was in place. Here are a few shots showing the work at the end of the day. In the first picture you can see the first coat of varathane on the back walls and the two shelves on the left side of the picture.


On Thursday we painted a second coat of Varathane over all the surface areas and on Friday we painted a third coat of varathane on select surfaces like the top of the shelf and the lower shelf.

On Saturday we finished off all the major work on the construction of the cabinet carcass. This also included installed a support system for the man made countertop that will eventually be installed over top. The job was a little tedious and there were a couple of swear words mentioned when I made a few mistakes but on the whole it looks pretty good. I still need to fill in the nail holes and then sand everything smooth before we put the first coat of varathane on. As well I'll probably also make the two fake fronts for under the sink above the two doors and install them before varathaning as well. So here are a few pictures showing the work completed today.


So hopefully this coming week we will be able to make the majority of the drawers and get the ball rolling on installing a countertop. I already have a sink here and the taps will hopefully be on the way shortly. So who know maybe in a few weeks we'll have a functional kitchen. It may still take a while to build doors but who cares I can live with cabinets without doors for quite a while. 

Well until next week batten down the hatches and keep warm, because they say winter is coming.

Harold