On Sunday we finished the board and batten on the side porch. The only thing left to do is give it a coat of Thompson's water seal. However this will need to wait until next year as I don't think we'll have the weather to properly paint a coat on it. After this was done we spent some time cutting out the shelves that we still needed to make for the upper units. As well I cut out some solid cherry to face the plywood shelves. Lastly we spent some time sanding down the lower cabinet carcass after we'd filled in the nail holes. I was hoping to get this done but for some reason I broke two sanding belts for the belt sander and did not have another replacement. Oh well we'll buy some more on Monday at work. Here is a picture showing the board and batten.
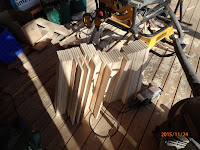
So on Tuesday we started by cutting out the drawer pieces. So I have 4 banks of drawers each with 3 drawers. Each drawer has 4 sides. Each side needs three cutting operations after being cut to size. First we need to cut a 1/4" groove in the bottom for the drawer bottom. Then the sides need two grooves cut at each end to accept a "tongue" from the front and back pieces. Then the front and back need a rabbit cut so as to create a tongue to fit into the sides. Simple you say however I do not have a dado blade setup to cut out the groove in one shot so each piece (48) needs to go through the table saw three times so that I can cut out the 1/4" grooves then the sides (24) need to go through six times to cut out the grooves at either end and then the front and back (24) need to go through 4 times to cut out the rabbit at each end. Needless to say we spent a little bit of time at the table saw. Oh let me add that before that I also needed to do some belt sanding as I free handed the cutting of the sides since they are not rectangular. My side taper down so I needed to clamp up eight sides so as to be able to sand smooth the angular cut. Here are some photos showing all this. The first one shows me free handing the taper cut with my cordless skilsaw, second we are sanding down this edge so all eight pieces are symmetrical. Then the third picture just shows all the pieces stacked up after all the milling was complete and the last picture shows the pieces stacked in front of their respective drawer stack.
On Wednesday we worked on the shelves for the uppers and started the glue up of the drawers for the lowers. Due to amount of clamps I could use, I could only glue up two drawers at a time. I left each pair in the clamps at least 4-5hrs so it took a while to glue them all up. I also could only glue up half the shelves at one time also so I had a little down time to contemplate future work in the house. Here are a couple of pictures showing the glue up process.
So today we started by sanding down all the shelves for the uppers and rounding over the edges. Once this was done we filled in any small gaps we found and left them to dry. Once the wood filler was dry gave them a final sanding and then cleaned them before applying the first coat of varathane. Since I managed to get this done around noon hour meant that I could put a second coat on later this evening. So the shelves are now drying as I write this article. I varathaned both sides and will not only varathane the top and front for the final two coats. Here is a picture showing the pieces laying out on the lower cabinets after their first coat of varathane. There will be two shelves per cabinet.
In between this all we glued up the last pair of drawers early in the morning and in the afternoon started work on rounding over the edges and sanding down the drawers. After each drawer was sanded I brought it inside for a trial fit. Three of the drawers needed a little bit more aggressive sanding on the sides so that they would fit smoothly in between the full extension drawer slides. As well it looks like a couple of the drawers will need some shimming under the drawer slides to ensure proper installation. I'll probably just use some washers to shim them out. Here is a picture of the drawers after this work and awaiting varathaning.
I thought about starting the varathaning tonight but when I opened the can that I had left over from my old house there was to much contamination from the can rusting out. So we had to dilute and throw out the leftover varathane and we'll just pick up a new can on Monday. I tend to use the water based product so disposal is not as problematic as the oil based products. I also spent some time cutting down some of the remaining cherry I had for drawer fronts. Now we just need to pick up a few more boards to finish making the drawer fronts. As for the cabinet doors I'll probably wait until next spring to do them in the garage. That is unless I get bored later this winter and decide to start them sooner. So for the next week we'll finish doing as much of the varathing as possible. Then we'll install the Ditra heat membrane in the second bathroom, finally I'll probably look at getting the countertop guy out to measure up for my countertops.
So until we meet again have a great week.
Harold


No comments:
Post a Comment