On Monday the forming guys came and started working on the forms. Unfortunately I was not there to meet them first thing as I took a trip to Burlington to pick up two Sterling Accord Shower kits from a company called EMCO. By the time I got home, unloaded and out to the site it was 10am. By this time the two concrete fellows had already formed up the garage and were soon to start on the house. Since the house is essentially a big square box this did not take them to long either. They were easily finished by Noon however they needed to wait for the rebar to show up before they could officially call the forms complete. Shortly after noon they called up the concrete truck to pour the footings and by 3pm the footings were poured and ready for the next stage. Here are some pictures showing this. First one is the garage footings as I showed up. Second is the house footings done. Third one they are pouring concrete in the garage using a conveyor concrete truck. Fourth shows them pouring the pier footings without using forms. The last one shows them troweling off the forms after using the Neighbours driveway to pour the last of the forms in the house. I am glad that I have very accommodating neighbours, it makes my life easier.


On Tuesday the crew came back and stripped the forms and installed the drainage tile and the sump pump pit. After they were done I went into the hole and dug a small trench for the sewer pipe that will be under the slab. I had the time and figured cheaper for me to do this then to have the plumber charge me for this task. Then the first of the two slinger trucks came and started to dump gravel in the hole for under the slab and around the footings for the drain pipe. On Wednesday they finished this job and the first of the house forms were delivered on Wednesday afternoon. Here are a couple of pictures of this. First picture shows the trench I dug and you can see the drainpipe around the footings. Second picture shows the gravel in the hole and the first of the house forms being delivered. Also in the second picture you can see a small pile in the middle of the house. I decided to bring in the blocks and mortar mix I would need to build up the middle footing for the load bearing wall. Easier to bring them in now then later on overtop of an eight foot wall.


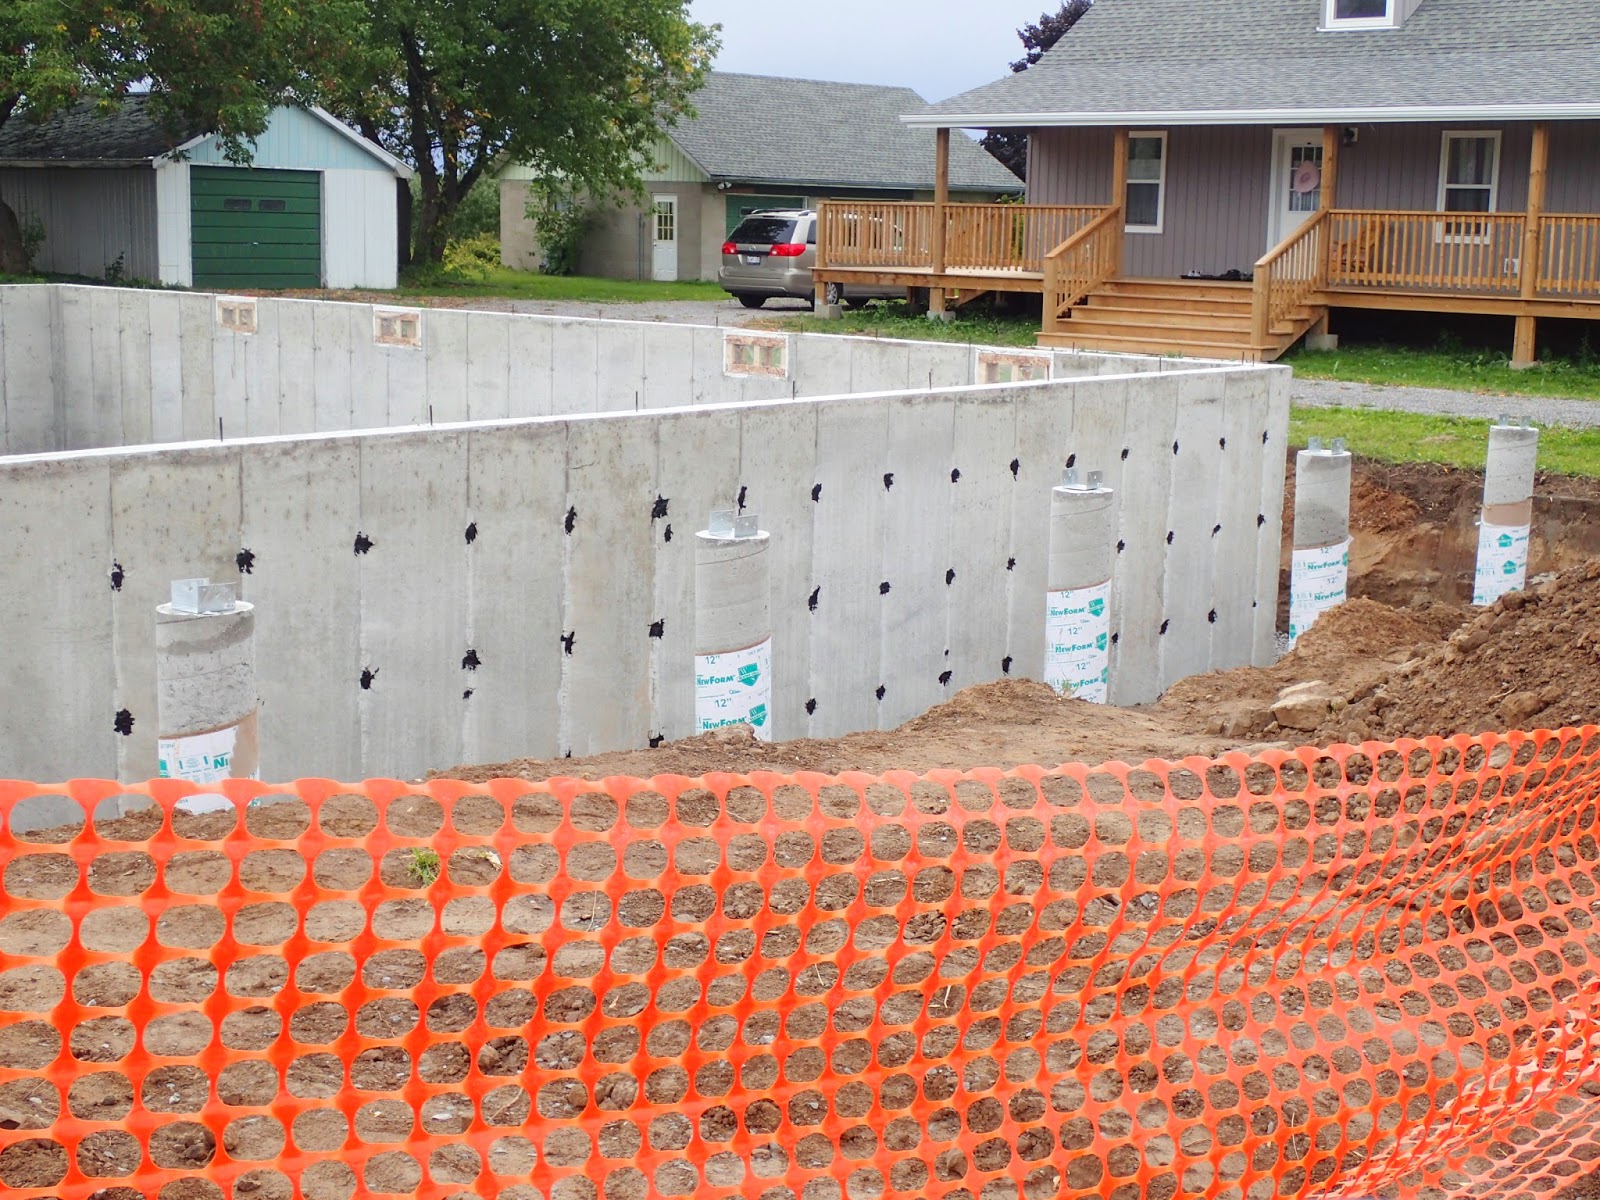
Thursday morning the fireworks began. Not only did I have a 5 man crew there to build up the forms but they brought in a second crew as well so we had around 10 people installing all the forms for the garage and house. This means that once they started forming at 1130 by 1500 they had all the forms installed, and the staging, just waiting for the first concrete truck. The foreman started this all by measuring out from the steel pins the surveyors had installed and laying down chalk lines for the forms to follow. Once they had the exterior lines all chalked and verified they pounded the steel pins into the footings so they would not interfere with the wall forms. The forms they use these days makes their job easier. First of all they have 2ft forms for the main runs, they they have preformed inner and outer corners as well as filler strips in various widths to fill out the walls. They lock together with steel pins and clips such that they build a wall almost as fast as they can stand up the forms. As well the forms have small studs and latches that allow special brackets to be attached so they can lay up 2by10's as staging. Then some braces on the forms to ensure the wall is straight and next comes the concrete. It took 5 trucks to bring the 45cubic metres of concrete they used to fill up the garage and house forms. Here are some pictures of this. First picture shows them setting the first corner. Second picture is a closeup of this corner and the pins and latches that hold the forms together. The pin is prestressed to snap off in four locations as I talk about later in this blog. The pin fits in notches and the latches swing over this pin locking it in and locking the two forms together. Third picture is about 1hr into the job. Fourth picture shows the forms up with the staging and awaiting concrete. You can also see in the foreground the string I used stretched across a batter board that was used to line up where the saddles went in the piers. I did this for the front and back set of piers. The side piers were installed measuring from the forms. Fifth picture shows the crew pouring concrete using a pumper truck system. By 1800 I was closing the fence and all the concrete was poured and the trucks had left the site.


Friday morning a crew quickly came in and removed all the staging materials and then at 1130 an other crew came in to strip the forms. This crew had about 8 people and the forms were all stripped and cleaned up by 1530. The concrete walls looked great, no cold cures and no voids. The only issue was that for some reason the saddles I installed on the front set of piers were not parallel to the wall. The last one at the west end was exactly 6ft from the wall where it should be however the other end was 5ft11in from the wall. All the ones in between marched in a straight line so some how I either misplaced the string when installing it or it was bumped prior to me installing the saddle and I missed this. I tend to think the string got bumped as I had measured it a few times while setting it up. This is not a big issue and can be easily compensated for. As well it will not be the last mistake I'm sure that will be found on this project. Although I really plan on trying to make sure they are few and far between. So here are a few pictures showing the stripping operation, and no there were no clothes removed just concrete forms. First picture shows them stripping the garage forms. I guess I don't have any from the house however the second picture is the view at the end of the day once all the forms were removed.


So now it was time for me to go to work. On Saturday morning I went out to the site and started by going around the entire house with small sledge and large chipping chisel and carefully chipped of as much of the protrusions as I could. This would be remains of pin nubs and what oozes out between some of the forms. Would have been real nice to have all brand new forms as this would have made my life a little easier however I don't think I want to start paying for a new set of forms for my house. When the forms are removed there are small nubs left behind were the steel pins protrude. The are broken off and a portion of the steel pins is broken off as well. For reference this steel pin that is used to hold the forms together has 4 points on the pin where it can be broken with a little bit of work. They first twist off the outer piece when they remove the latching mechanism from the form upon stripping the forms. They then remove the form and once the forms are all removed they go around break off the nubs and the second small piece of steel pin. This crew only does the inside ones as they said the waterproofing crew does the exterior. Since there is no waterproofing crew since I am doing it myself a couple fellows stayed behind for 10 min to help me knock of the exterior stubs on Friday afternoon. When they do this there are always small pieces that don't come off and they don't exactly make sure it is 100% smooth. Once I had gone around with the chipping hammer and done as much as I could that way I grabbed my battery operated cutoff saw and with a concrete blade in it went around and smoothed all the seams. I did this because I am installing a rubberized membrane over the concrete and I did not want any rough or sharp protrusions that might damage the membrane. Once I had smoothed the North wall I took a tube of Polybitume sealant and proceeded to patch the small holes where the steel pins went through the wall. I just did the North wall on Saturday to see how much sealant I would need and once that was finished called it a day so I could go into town to buy the remaining tubes of sealant for Sunday. On Sunday went back at it and finished it all up. I finished the grinding since I needed to recharge the batteries and did not complete this on Saturday and then I went around and patched every pin hole. There are 4 pin holes per form per 2ft of wall so with 176 ft of wall I had 356 pin holes to patch over. So here are the obligatory photos. First picture shows the North wall at the end of Saturday. I had used one 850ml tube of sealant on this wall and had another 2 tubes so I decided to buy three more tubes. Second picture shows me using my cordless angle grinder to grind away the excess concrete. I used about 7 battery charges and 3 small concrete blades doing all this work. Third picture shows me working on the East wall.


By about 1400 I was finished patching all the pin holes and luckily enough I missed any rain on Saturday and Sunday that would have stopped me as wet concrete does not accept the sealant all that well. The next job is to install the Blueskin product. I hope that the weather will stay nice for the next few days so that I can install the Blueskin membrane as well as the outer dimple membrane. Once that is done I'll need to scrap the gravel up over the drain pipe and footing and have the Building inspector come to approve it all. Once that is done I'll need to brace the walls from the inside so that the backfilling can be done hopefully by Friday this week so that on next week Wednesday the framing can begin.
Well there you have it the story of my week. All the best and see you next week.
Harold
No comments:
Post a Comment